Nhân viên mới
When a new employee is hired, the first step is to create a new employee record. This record is a centralized place where all important information about the employee is stored, including general information, job history and skills, various work information, personal details, documents, and more.
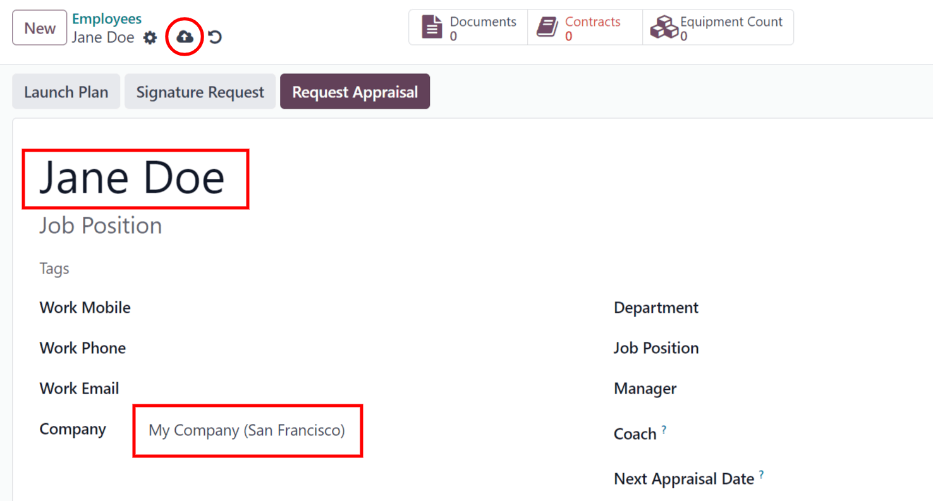
Để bắt đầu, mở ứng dụng , sau đó nhấp vào nút Mới ở góc trên bên trái. Thao tác này hiển thị biểu mẫu nhân viên trống.
Tiến hành điền các thông tin bắt buộc, cùng với bất kỳ chi tiết bổ sung nào.
Ghi chú
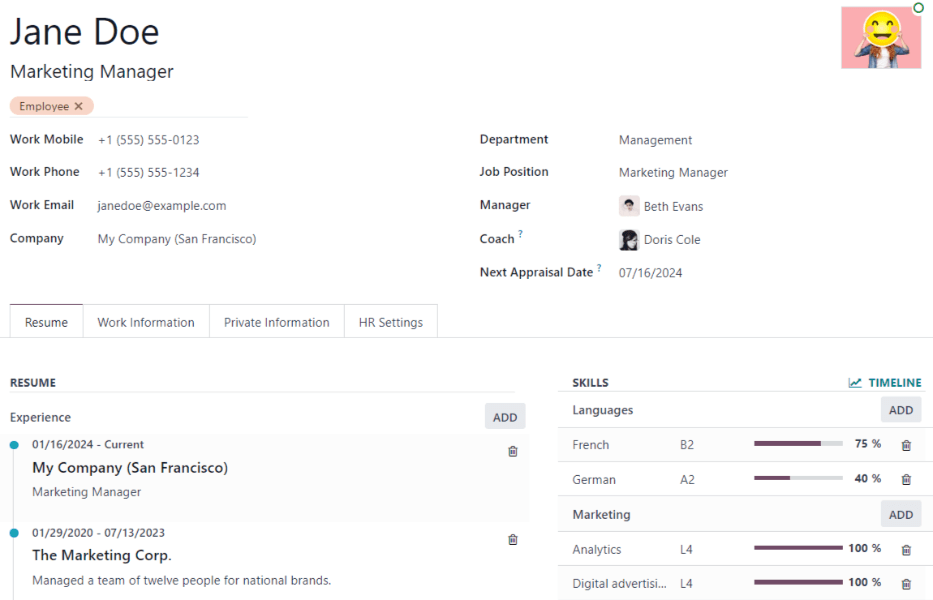
The current company phone number and name are populated in the Work Phone and Company fields. If the Appraisals application is installed, the Next Appraisal Date field is populated with a date six months from the current date.
Thông tin chung
The employee form automatically saves as data is entered. However, the form can be saved manually at any time by clicking the Save manually option, represented by a (cloud with an upwards arrow) icon.
Required fields
Employee's Name: enter the employee's name.
Company: from the drop-down menu in this field, select the company the new employee was hired by, or create a new company by typing the name in the field, and clicking Create or Create and edit... from the mini drop-down menu that appears.
Các trường thông tin không bắt buộc
Photo: in the top-right image box of the employee form, click on the ✏️ (pencil) edit icon to select a photo to upload.
Vị trí công việc: nhập chức danh của nhân viên bên dưới tên của họ, hoặc chọn từ menu thả xuống ở trường Vị trí công việc bên dưới để tự động điền vào trường phía trên. Trường Vị trí công việc bên dưới tên nhân viên có thể được chỉnh sửa và không cần phải khớp với lựa chọn trong menu thả xuống Vị trí công việc ở trường bên dưới.
Example
While it is recommended to have the job positions match, the typed-in description in this top field can contain more specific information than the selected drop-down Job Position, if desired.
For instance, if someone is hired for a sales representative position configured as Sales Representative in the Recruitment app, that can be selected in the drop-down Job Position field.
In the typed-in Job Position field beneath the Employee's Name field, the position could be more specific, such as
Sales Representative - Subscriptionsif the employee is focused solely on subscription sales.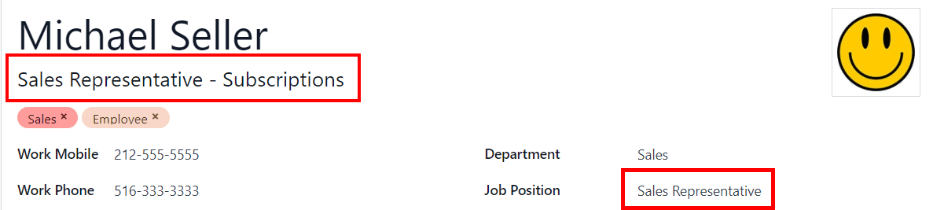
Tags: select a tag from the drop-down menu to add relevant tags to the employee. Any tag can be created in this field by typing it in. Once created, the new tag is available for all employee records. There is no limit to the amount of tags that can be added.
Work Contact Information: enter the employee's Work Mobile, Work Phone, Work Email, and/or Company name, if not already auto-populated.
Department: select the employee's department from the drop-down menu.
Job Position: select the employee's job position from the drop-down menu. Once a selection is made, the Job Position field beneath the Employee's Name field automatically updates to reflect the currently selected job position. These positions are from the Recruitment application, and reflect the currently configured job positions.
Manager: select the employee's manager from the drop-down menu.
Coach: select the employee's coach from the drop-down menu.
Next Appraisal Date: this field is only visible if the Appraisals application is installed. The date automatically populates with a date that is computed according to the settings configured in the Appraisals application. This date can be modified using the calendar selector.
Ghi chú
After a Manager is selected, if the Coach field is blank, the selected manager automatically populates the Coach field.
Mẹo
To make edits to the selected Department, Manager, Coach, or Company, click the Internal Link arrow next to the respective selection. The Internal Link arrow opens the selected form, allowing for modifications. Click Save after any edits are made.
Additional information tabs
Tab Resumé
Resumé
Tiếp theo, nhập lịch sử làm việc của nhân viên trong tab Sơ yếu lý lịch. Mỗi dòng trong sơ yếu lý lịch phải được nhập riêng. Khi tạo mục nhập lần đầu tiên, nhấp vào Tạo mục nhập mới và biểu mẫu Tạo dòng sơ yếu lý lịch sẽ xuất hiện. Sau khi thêm mục nhập, nút Tạo mục nhập mới sẽ được thay thế bằng nút Thêm. Nhập các thông tin sau cho từng mục nhập.
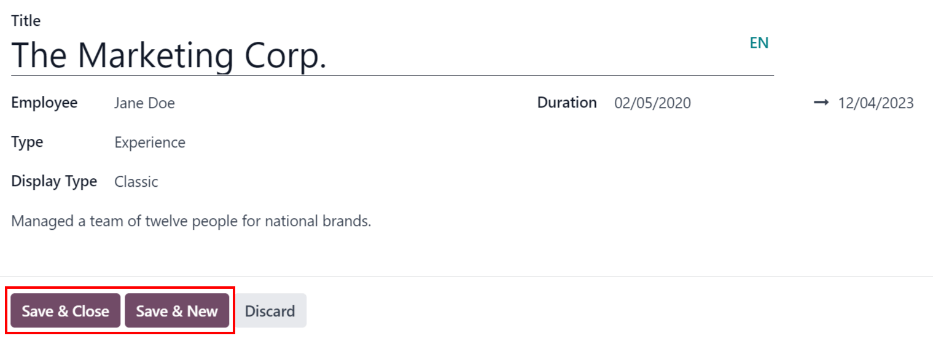
Tiêu đề: nhập tiêu đề của kinh nghiệm làm việc trước đó.
Nhân viên: chọn nhân viên từ menu thả xuống.
Type: from the drop-down menu, select either Experience, Education, Side Projects, Internal Certification, Completed Internal Training, or type in a new entry, then click Create "(Type)".
Display Type: from the drop-down menu, choose Classic for typical work experience, Certification for experience gained through a certification, or Course for non-certified classes.
Thời gian: nhập ngày bắt đầu và ngày kết thúc cho kinh nghiệm làm việc. Để chọn ngày, nhấp vào trường trống đầu tiên để hiển thị cửa sổ pop-up lịch. Sử dụng các biểu tượng < (mũi tên trái) và > (mũi tên phải) để chuyển đến tháng mong muốn, sau đó nhấp vào ngày để chọn. Lặp lại quy trình này để tìm và chọn ngày kết thúc. Sau khi đã chọn xong các ngày mong muốn, nhấp vào ✔️ Áp dụng.
Mô tả: nhập bất kỳ chi tiết liên quan nào vào trường này.
Sau khi nhập xong tất cả thông tin, nhấp vào nút Lưu & Đóng nếu chỉ có một mục cần thêm, hoặc nhấp vào nút Lưu & Tạo mới để lưu mục hiện tại và tạo dòng hồ sơ khác.
Ghi chú
Sau khi lưu biểu mẫu nhân viên mới, vị trí và công ty hiện tại sẽ tự động được thêm vào tab Hồ sơ, với ngày kết thúc được liệt kê là current.
Kỹ năng
Kỹ năng của nhân viên có thể được nhập trong tab Hồ sơ theo cách tương tự như tạo dòng hồ sơ.
In order to add a skill to an employee record, the skill types must be configured first. If no skill types are configured, a Create new Skills button appears in the Skills section of the Resumé tab. Configure the skill types before adding any skills to the employee record.
If the skill types are configured, a Pick a skill from the list button appears instead. Click the Pick a skill from the list button, and select the following information for each skill.
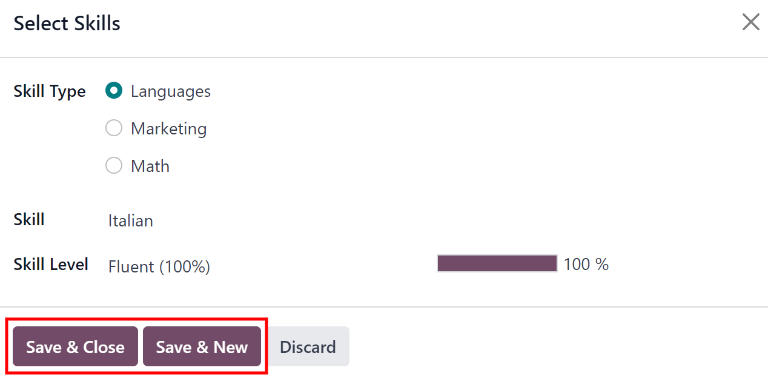
Loại kỹ năng: chọn một loại kỹ năng bằng cách nhấp vào nút radio bên cạnh loại kỹ năng.
Kỹ năng: sau khi chọn một Loại kỹ năng, thì các kỹ năng tương ứng với Loại kỹ năng đã chọn sẽ xuất hiện trong một menu thả xuống. Ví dụ, khi chọn Ngôn ngữ làm Loại kỹ năng, thì một danh sách các ngôn ngữ sẽ xuất hiện trong trường Kỹ năng. Chọn kỹ năng phù hợp đã được cấu hình sẵn, hoặc nhập một kỹ năng mới rồi nhấp Tạo "(kỹ năng mới)".
Cấp độ kỹ năng: các cấp độ kỹ năng xác định trước liên quan đến Loại kỹ năng đã chọn sẽ xuất hiện trong menu thả xuống. Đầu tiên, chọn một Cấp độ kỹ năng, sau đó thanh tiến trình sẽ tự động hiển thị tiến trình xác định trước cho cấp độ kỹ năng cụ thể đó. Các cấp độ kỹ năng và tiến trình có thể được điều chỉnh trong biểu mẫu bật lên Cấp độ kỹ năng, được truy cập thông qua mũi tên Liên kết nội bộ bên cạnh trường Cấp độ kỹ năng.
Nhấp vào nút Lưu & Đóng nếu chỉ có một kỹ năng cần thêm, hoặc nhấp vào nút Lưu & Tạo mới để lưu mục hiện tại và thêm ngay một kỹ năng khác.
To delete any line from the Resumé tab, click the 🗑️ (trash can) icon to delete the entry. Add a new line by clicking the Add button next to the corresponding section.
Quan trọng
Only users with Officer: Manage all employees or Administrator rights for the Employees app can add or edit skills.
Loại kỹ năng
In order to add a skill to an employee's form, the Skill Types must be configured. Go to to view the currently configured skill types and create new skill types.
Ghi chú
The default skill of Languages is pre-configured as a skill type, but there are no specific language skills listed within that skill type. The Languages skill type must be fully configured before it can be used.
Click New and a new Skill Type form appears. Fill out all the details for the new skill type. Repeat this for all the needed skill types.
Loại kỹ năng: nhập tên loại kỹ năng. Đây hoạt động như danh mục cha cho các kỹ năng cụ thể hơn và nên có tính chung chung.
Skills: click Add a line, and enter the Name for the new skill, then repeat for all other needed skills.
Levels: click Add a line, and enter the Name of the level. Next, click into the Progress field, and enter a percentage (0-100) for that level. Repeat for all additional levels, as needed.
Default Level: click the toggle on the level line to set that level as the default. Typically, the lowest level is set as the default, but any level can be chosen. The toggle turns green, indicating it is the default level for the skill. Only one level can be set as the default.
Example
Để thêm bộ kỹ năng toán học, nhập
Toánvào trường Tên. Tiếp theo, trong trường Kỹ năng, nhậpĐại số,Giải tíchvàLượng giác. Cuối cùng, trong trường Cấp độ, nhậpMới bắt đầu,Trung cấpvàChuyên gia, với Tiến độ tương ứng là25,50và100. Sau cùng, nhấp Đặt làm mặc định trên dòngMới bắt đầuđể đặt đây làm cấp độ kỹ năng mặc định.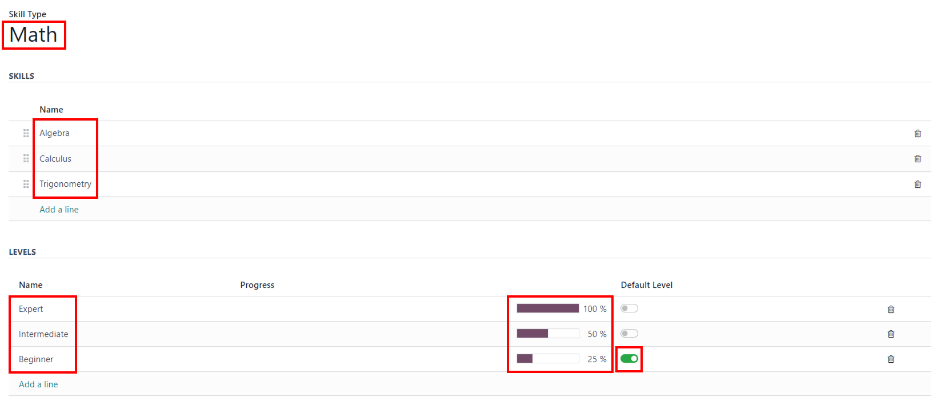
The Skill Type form automatically saves as data is entered.
Mẹo
Sau khi điền đầy đủ biểu mẫu, nhấp nút Lưu thủ công được biểu thị bằng biểu tượng đám mây có mũi tên hướng lên ở đầu màn hình. Các Cấp độ sẽ tự động sắp xếp theo thứ tự giảm dần, với cấp cao nhất ở trên cùng và thấp nhất ở dưới cùng, bất kể cấp độ mặc định và thứ tự nhập ban đầu.
Tab thông tin công việc
The Work Information tab is where the employee's specific job related information is found. Their working schedule, various roles, who approves their specific requests (time off, timesheets, and expenses), their remote work schedule, and specific work location details are listed here.
Click on the Work Information tab to access this section, and enter the following information for the new employee:
Location: select the Work Address from the drop-down menu. To modify the address, hover over the first line (if there are multiple lines) of the address to reveal an Internal Link arrow. Click the Internal Link arrow to open up the company form, and make any edits.
Sử dụng liên kết breadcrumb để quay lại biểu mẫu nhân viên mới khi hoàn tất.
Nếu cần địa chỉ làm việc mới, thêm địa chỉ bằng cách gõ vào trường, sau đó nhấp vào Tạo (địa chỉ mới) để thêm địa chỉ, hoặc Tạo và chỉnh sửa... để thêm địa chỉ mới và chỉnh sửa biểu mẫu địa chỉ.
Approvers: to see this section, the user must have either Administrator or Officer: Manage all employees rights set for the Employees application. Using the drop-down menus, select the users responsible for approving an Expense, a Time Off request, Timesheet entries, and Attendance records for the employee.
Hover over any of the selections to reveal the Internal Link arrow.
Click the Internal Link arrow to open a form with the approver's Name, Email Address, Company, Phone, Mobile, and Default Warehouse fields. These can be modified, if needed.
Sử dụng liên kết breadcrumb để quay lại biểu mẫu nhân viên mới khi hoàn tất.
Quan trọng
Người dùng xuất hiện trong menu thả xuống cho phần Người phê duyệt phải có quyền Quản trị viên được đặt cho vai trò nhân sự tương ứng.
To check who has these rights, go to . Then, click on an employee, and check the Human Resources section of the Access Rights tab.
Để người dùng xuất hiện với tư cách người phê duyệt cho Chi phí, họ phải có Người phê duyệt nhóm, Người phê duyệt tất cả, hoặc Quản trị viên được đặt cho vai trò Chi phí.
Để người dùng xuất hiện với tư cách người phê duyệt cho Nghỉ phép, họ phải có Quản lý: Quản lý tất cả yêu cầu hoặc Quản trị viên được đặt cho vai trò Nghỉ phép.
In order for the user to appear as an approver for Timesheets, they must have either Manager, Officer:Manage all contracts, or Administrator set for the Payroll role.
Remote Work: use the drop-down menu to select the default location the employee works from each day of the week. The default options are Home, Office, or Other.
Một vị trí mới có thể được nhập vào trường, sau đó nhấp vào Tạo (vị trí mới) để thêm vị trí, hoặc Tạo và chỉnh sửa... để thêm vị trí mới và chỉnh sửa biểu mẫu.
Sau khi chỉnh sửa xong, nhấp vào Lưu & Đóng, và vị trí mới được thêm vào và điền vào trường.
Leave the field blank (Unspecified) for non-working days like Saturday and Sunday.
Ghi chú
It is also possible to add or modify work locations by navigating to . To modify a location, click on an existing location, then make any changes on the form.
Nhấp vào Mới để tạo vị trí mới, sau đó nhập thông tin sau vào biểu mẫu. Tất cả các trường đều bắt buộc.
Địa điểm làm việc: nhập tên cho địa điểm. Có thể chung chung hoặc cụ thể tùy theo nhu cầu, chẳng hạn như
NhàhoặcTòa nhà 1, Tầng 2.Địa chỉ làm việc: sử dụng menu thả xuống để chọn địa chỉ cho địa điểm.
Cover Image: click on the icon to select it for the Cover Image. Options are a house icon, an office building icon, and a GPS location marker icon.
Company: using the drop-down menu, select the company the location applies to. The current company populates this field, by default.

Schedule: select the Working Hours and Timezone for the employee. The Internal Link arrow opens a detailed view of the specific daily working hours. Working hours can be modified or deleted here.
Ghi chú
Giờ làm việc liên quan đến lịch làm việc của công ty, và Nhân viên không thể có giờ làm việc nằm ngoài lịch làm việc của công ty.
Each individual working schedule is company-specific. So, for multi-company databases, each company needs to have its own working schedules set.
Nếu giờ làm việc của nhân viên không được cấu hình thành lịch làm việc cho công ty, có thể thêm lịch làm việc mới hoặc sửa đổi lịch làm việc hiện có.
Working hours can be modified in the Payroll application, where they are referred to as Working Schedules.
For more information on how to create or modify Working Schedules in the Payroll application, refer to the Bảng lương documentation.
Planning: select a role from the drop-down menu for both the Roles and the Default Role fields. If the Default Role is selected as a role, it is automatically added to the list of Roles.
Quan trọng
Người dùng xuất hiện trong menu thả xuống cho phần Người phê duyệt phải có quyền Quản trị viên được đặt cho vai trò nhân sự tương ứng.
To check who has these rights, go to . Click on an employee, and check the Human Resources section of the Access Rights tab.
Để người dùng xuất hiện với tư cách người phê duyệt cho Chi phí, họ phải có Người phê duyệt nhóm, Người phê duyệt tất cả, hoặc Quản trị viên được đặt cho vai trò Chi phí.
In order for the user to appear as an approver for Time Off, they must have either Officer or Administrator set for the Time Off role.
In order for the user to appear as an approver for Timesheets, they must have either Manager, Officer, or Administrator set for the Payroll role.
Ghi chú
Working Hours are related to a company's working times, and an employee cannot have working hours that are outside of a company's working times.
Each individual working time is company-specific. So, for multi-company databases, each company must have its own working hours set.
If an employee's working hours are not configured as a working time for the company, new working times can be added, or existing working times can be modified.
To add or modify a working time, go to the . Then, either add a new working time by clicking New, or edit an existing one by selecting a Working Time from the list to modify it.
Refer to the Working schedules section of the payroll documentation for specific details on creating and editing working schedules.
After the new working time is created, or an existing one is modified, the Working Hours can be set on the employee form. In the Schedule section of the Work Information tab, select the employee's working hours using the drop-down menu.
Tab thông tin cá nhân
No information in the Private Information tab is required to create an employee, however, some information in this section may be critical for the company's payroll department. In order to properly process payslips and ensure all deductions are accounted for, the employee's personal information should be entered.
Here, the employee's Private Contact, Family Status, Emergency contact, Education, Work Permit, and Citizenship information is entered. Fields are entered either using a drop-down menu, ticking a checkbox, or typing in the information.
Private Contact: enter the Private Address, Email, and Phone for the employee. Then, enter the employee's Bank Account Number using the drop-down menu.
If the bank is not already configured (the typical situation when creating a new employee), enter the bank account number, and click Create and edit... A Create Bank Account Number form loads. Fill in the necessary information, then click Save & Close.
Next, select the employee's preferred Language from the drop-down menu. Then enter the Home-Work Distance in the field. This field is only necessary if the employee is receiving any type of commuter benefits.
Lastly, enter the employee's license plate information in the Private Car Plate field.
Family Status: select the current Marital Status using the drop-down menu, either Single, Married, Legal Cohabitant, Widower, or Divorced. If the employee has any dependent children, enter the Number of Dependent Children in the field.
Emergency: type in the Contact Name and Contact Phone number of the employee's emergency contact in the respective fields.
Education: select the highest level of education completed by the employee from the Certificate Level drop-down menu. Default options include Graduate, Bachelor, Master, Doctor, or Other.
Type in the Field of Study, and the name of the School in the respective fields.
Work Permit: if the employee has a work permit, enter the information in this section. Type in the Visa No (visa number), and/or Work Permit No (work permit number) in the corresponding fields.
Using the calendar selector, select the Visa Expiration Date, and/or the Work Permit Expiration Date, to enter the expiration date(s).
If available, upload a digital copy of the Work Permit document. Click Upload your file, navigate to the work permit file in the file explorer, and click Open.
Citizenship: this section contains all the information relevant to the citizenship of the employee. Some fields use a drop-down menu, as the Nationality (Country), Gender, and Country of Birth fields do.
Ngày sinh sử dụng bộ chọn lịch để chọn ngày. Đầu tiên, nhấp vào tên tháng, sau đó là năm để truy cập các khoảng năm. Sử dụng biểu tượng mũi tên < (trái) và > (phải) để điều hướng đến khoảng năm chính xác và nhấp vào năm. Tiếp theo, nhấp vào tháng. Cuối cùng, nhấp vào ngày để chọn.
Type in the information for the Identification No (identification number), Passport No (passport number), and Place of Birth fields.
Lastly, if the employee is not a resident of the country they are working in, activate the checkbox next to the Non-resident field.
Ghi chú
Tùy thuộc vào cài đặt địa phương hóa, các trường khác có thể xuất hiện. Ví dụ, đối với Hoa Kỳ, có trường Số an sinh xã hội.
Tab Cài đặt HR
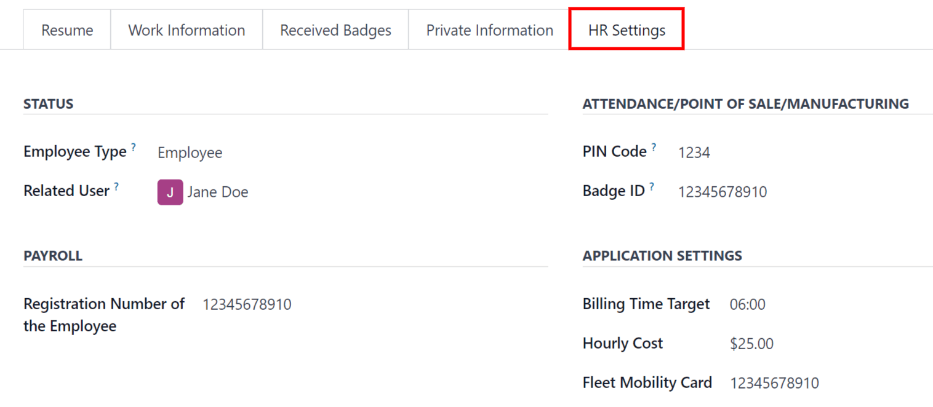
This tab provides various fields for different information, depending on the country the company is located. Different fields are configured for different locations, however some sections appear regardless.
Status: select an Employee Type and, if applicable, a Related User, with the drop-down menus. The Employee Type options include Employee, Student, Trainee, Contractor, or Freelancer.
Quan trọng
Employees do not also need to be users. Employees do not count towards the Odoo subscription billing, while Users do count towards billing. If the new employee should also be a user, the user must be created.
After the employee is created, click the ⚙️ (gear) icon, then click Create User. A Create User form appears.
Type in the Name and Email Address. Next, select the Company from the drop-down menu.
Then, enter the Phone and Mobile numbers in the respective fields.
If a photo is available, click the Edit icon (which appears as a ✏️ (pencil) icon) in the lower-left corner of the image box, which is located in the top-right corner of the form.
A file explorer pops up. Navigate to the file, then click Open to select it. Finally, click Save after all the information is entered, and the employee record is automatically updated with the newly-created user populating the Related User field.
Người dùng cũng có thể được tạo thủ công. Để biết thêm thông tin về cách thêm người dùng thủ công, vui lòng tham khảo tài liệu Người dùng.
Attendance/Point of Sale/Manufacturing: the employee's PIN Code and Badge ID can be entered here, if the employee needs/has one. Click Generate next to the Badge ID to create a badge ID.
The PIN Code is used to sign in and out of the Attendance app kiosk, and a POS system.
Payroll: if applicable, enter the Registration Number of the Employee in this section.
Tùy theo thiết lập bản địa hoá, các mục khác xuất hiện trong trường này sẽ thay đổi theo từng quốc gia hoặc khu vực. Ngoài ra, các phần khác cũng có thể xuất hiện trong thẻ này tuỳ vào vị trí địa lý. Do đó, bạn nên kiểm tra với phòng kế toán và/hoặc lương để đảm bảo phần này, cũng như bất kỳ phần nào khác liên quan đến bảng lương, được điền chính xác.
Application Settings: enter the employee's Billing Time Target for the billing rate leader board in the Timesheets application. Next, enter the Hourly Cost in a XX.XX format. This is factored in when the employee is working at a work center.
If applicable, enter the Fleet Mobility Card number.
Ghi chú
Manufacturing costs are added to the costs for producing a product, if the value of the manufactured product is not a fixed amount. This cost does not affect the Payroll application.
Tài liệu
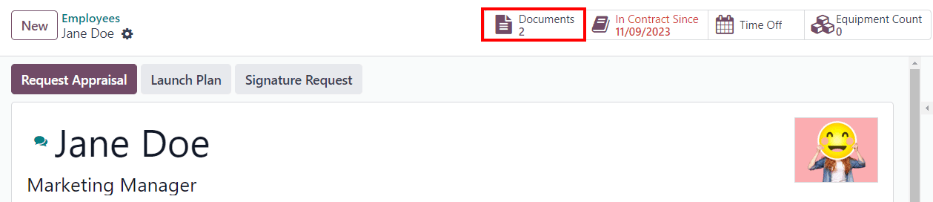
All employee-related documents are stored in the Documents app. The number of associated documents is displayed in the Documents smart button above the employee record. Click on the smart button to access all documents.
Refer to documentation on the Documents app for more information.