
Cho thuê
The Odoo Rental application provides comprehensive solutions to configure and manage rentals.
Gửi báo giá, xác nhận đơn hàng, lên lịch cho thuê, đăng ký sản phẩm khi chúng được lấy và trả lại, và lập hóa đơn cho khách hàng từ nền tảng duy nhất này.
Trang tổng quan
Upon opening the Rental application, the Rental Orders dashboard is revealed.
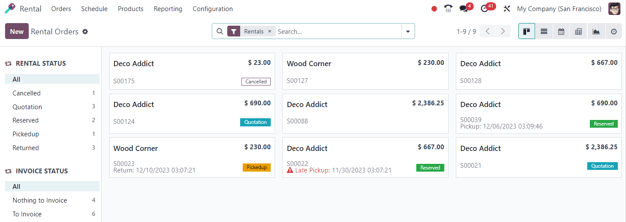
In the default kanban view, all rentals are visible. Each rental card displays the customer name, the price of the rental, the related sales order number, along with the status of the rental.
Ghi chú
Rental kanban cards that do not display a rental status means those rentals have confirmed quotations, but have not been picked up yet.
Ở thanh bên trái, có thể tìm thấy Trạng thái cho thuê cho mỗi đơn cho thuê. Bên dưới đó, có thể truy cập Trạng thái hóa đơn của các đơn cho thuê. Nhấp vào bất kỳ tùy chọn nào trong thanh bên trái sẽ lọc các đơn cho thuê được hiển thị trên Bảng điều khiển.
Cài đặt
To configure additional rental delay costs, availability of rental items, or minimum time of rental, navigate to .
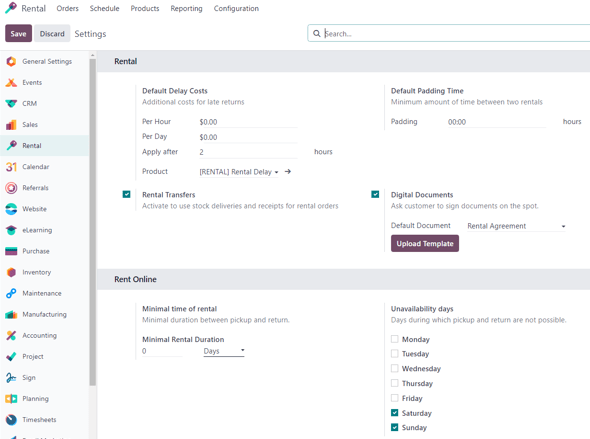
In the Rental section, there are options to configure Default Delay Costs and Default Padding Time. There is also the option to activate Rental Transfers and Digital Documents.
Default Delay Costs are additional costs for late returns.
Default Padding Time represents the minimum amount of time between two rentals.
Rental Transfers means stock deliveries and receipts can be used for rental orders.
- Digital Documents allows users to upload documents for customers to sign prior to
confirming their rental.
In the Rent Online section, there are options to configure a Minimal Rental Duration and designate Unavailability days, or days during which pickup and return are not possible.
Sản phẩm cho thuê
To view all products that can rented in the database, navigate to . By default, the Can be Rented search filter appears in the search bar.
Each product kanban card displays that product's name, rental price, and product image (if applicable).
Giá cho thuê
To adjust the rental pricing on a product, go to the Products page in the Rental app, then select the desired product or click New to create a new product from scratch.
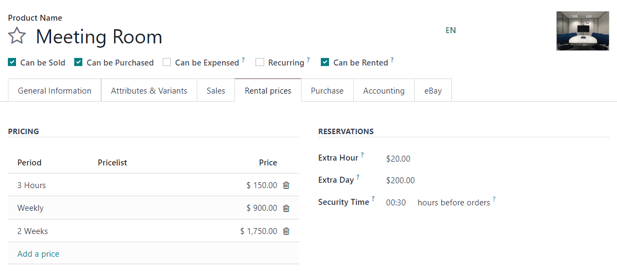
On the product form, ensure the Can be Rented checkbox is ticked. Then, open the Rental prices tab.
Ghi chú
If creating a rental product outside of the Rental app, just ensure the Can be Rented checkbox is ticked on the product form. By default, this checkbox is ticked whenever a product is created directly in the Rental application.
Định giá
Trong phần Định giá của tab Giá cho thuê, chỉ định giá cho thuê tùy chỉnh và thời gian cho thuê cho sản phẩm.
Để thêm giá cho một đơn cho thuê, nhấp Thêm giá. Sau đó, chọn một thời kỳ định giá (đơn vị thời lượng của đơn cho thuê) trong cột Thời kỳ, hoặc tạo một thời kỳ định giá mới bằng cách nhập tên và nhấp Tạo.
Tiếp theo, quyết định có áp dụng giá cho thuê tùy chỉnh này cho một Bảng giá cụ thể hay không.
Cuối cùng, nhập Giá mong muốn cho Thời kỳ cụ thể đó.
Ghi chú
There is no limit to how many pricing lines can be added. Multiple pricing options for rental products are typically used to give discounts for customers who agree to longer rental durations.
To delete any rental pricing option, click the 🗑️ (trash) icon, and that row is deleted.
Dự trữ
Under the Reservations section of the Rental prices tab, there is the option to configure additional fines for any Extra Hour or Extra Day that the customer takes to return a rental.
There is also the option to set a Security Time, expressed in hours, to make the rental product temporarily unavailable between two rental orders. Such a feature may prove useful if maintenance or cleaning is required between rentals.
Tính toán giá
Odoo luôn sử dụng hai quy tắc để tính giá của sản phẩm khi tạo đơn hàng cho thuê:
Chỉ sử dụng một dòng giá.
Dòng rẻ nhất được chọn.
Exercise
Xem xét cấu hình giá cho thuê sau đây cho một sản phẩm:
1 ngày: $100
3 ngày: $250
1 tuần: $500
Một khách hàng muốn thuê sản phẩm này trong tám ngày. Họ sẽ phải trả giá bao nhiêu?
Sau khi tạo đơn hàng, Odoo chọn dòng thứ hai vì đây là lựa chọn rẻ nhất. Khách hàng phải trả ba lần '3 ngày' để bao phủ tám ngày thuê, với tổng cộng là $750.
Đơn cho thuê
To create a rental order in the Rental app, navigate to , and click New. Doing so reveals a blank rental order form to be filled in accordingly.
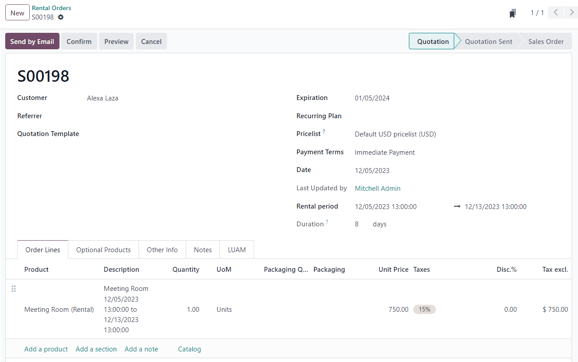
Start by adding a Customer, then configure the desired duration of the rental in the Rental period field.
To adjust the rental duration, click the first date in the Rental period field, and select the range of dates to represent the rental duration from the pop-up calendar form that appears.
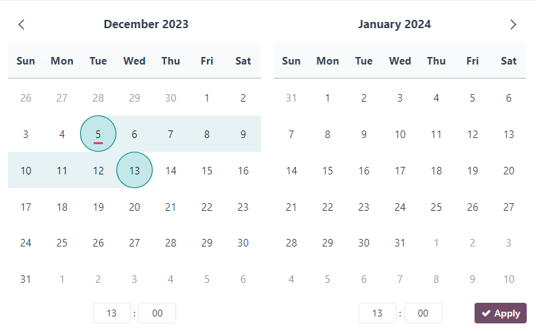
Once complete, click Apply in the calendar pop-up form. Following that, the pop-up form disappears, and the designated time period of the rental is represented in the Duration field.
Next, add a rental product in the Order Lines tab, by clicking Add a product, and selecting the desired rental product to add to the form.
Ghi chú
If a rental product is added before the Rental period field has been properly configured, the user can still adjust the Rental period field accordingly.
Simply select the desired range of dates to represent the duration of the rental, then click Update Rental Prices in the Duration field.

Làm như vậy sẽ hiển thị cửa sổ bật lên Xác nhận. Nếu mọi thứ đều chính xác, nhấp vào Ok và Odoo sẽ tính toán lại giá cho thuê tương ứng.
Once all the information has been entered correctly on the rental order form, click the Send by Email button to send the quotation to the customer, or click the Confirm button to confirm the order.
Chữ ký khách hàng
Upon confirming a rental order, the Sign Documents button appears. This gives the ability to request the customer sign a rental agreement, outlining the arrangement between the company and customer, before they pick up the rental product(s).
Such documents can ensure everything is returned on-time and in its original condition.
Quan trọng
The Sign Documents button/option only appears if the Digital Documents feature has been activated in the Rental application settings. To do so, navigate to , activate Digital Documents, and click Save.
Ghi chú
This feature also requires the Sign app. If necessary, Odoo automatically installs it after activating the Digital Documents setting.
To request a customer signature on a rental agreement, select a confirmed rental order, and click the Sign Documents button to reveal a Sign Documents pop-up window.
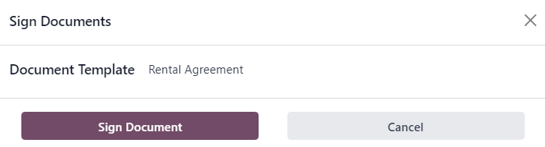
From here, select the desired document from the Document Template field. Then, click Sign Document. Doing so reveals a New Signature Request pop-up window.
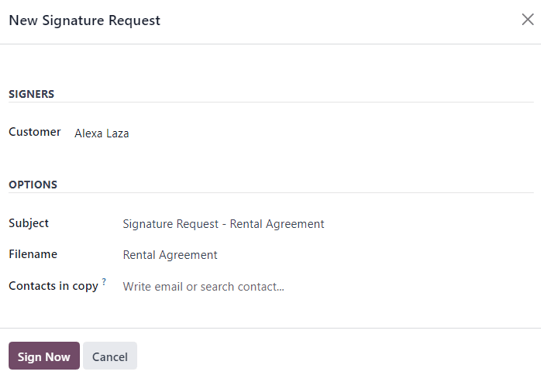
Upon confirming the information in the New Signature Request pop-up form, click Sign Now to initiate the signing process.
A separate page is then revealed, showcasing the document to be signed, which is accessible to the customer via the customer portal.
Odoo guides the customer through the signing process with clear, clickable indicators, and allows them to create electronic signatures to quickly complete the form.
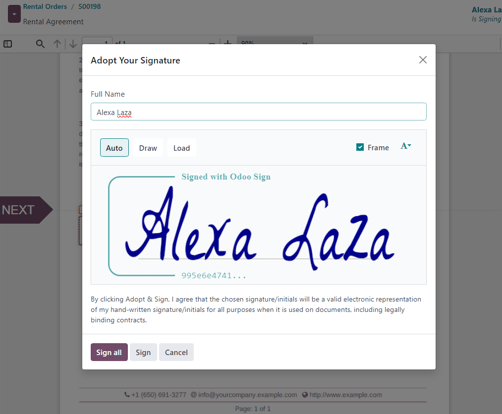
Once the document has been signed and completed, click the Validate & Send Completed Document button at the bottom of the document.
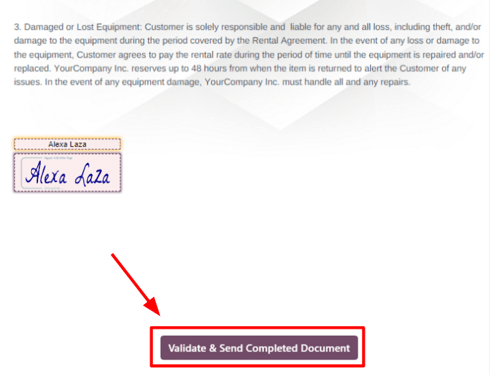
Upon clicking the Validate & Send Completed Document button, Odoo presents the option to download the signed document for record-keeping purposes, if necessary.
Xem thêm
Lấy sản phẩm
When a customer picks up the product(s), navigate to the appropriate rental order, click the Pickup button, and then click Validate in the Validate a pickup pop-up form that appears.
Làm như vậy sẽ đặt biểu ngữ trạng thái Picked-up trên đơn thuê.
Trả hàng
When a customer returns the product(s), navigate to the appropriate rental order, click the Return button, and validate the return by clicking Validate in the Validate a return pop-up form that appears.
Làm như vậy sẽ đặt biểu ngữ trạng thái Returned trên đơn thuê.
In biên nhận lấy và trả hàng
Pickup and return receipts can be printed for customers when they pick up and/or return rental products.
To print pickup and/or return receipts, navigate to the appropriate rental order, click the ⚙️ (gear) icon to reveal a drop-down menu.
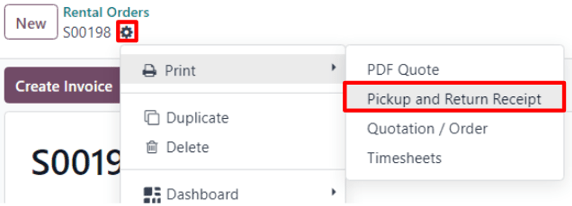
Từ menu thả xuống này, di chuột qua tùy chọn In để hiển thị menu phụ. Sau đó chọn Biên nhận lấy và trả hàng.
Odoo generates and downloads a PDF, detailing all information about the current status of the rented item(s).