Chủ đề sự kiện
Odoo Sự kiện cung cấp khả năng tạo, lên lịch trình và quản lý các bài nói chuyện, bài giảng, buổi trình diễn, bài thuyết trình, v.v., được gọi là Chủ đề trong Odoo.
Ứng dụng Odoo Sự kiện cũng có tùy chọn cho phép người tham dự sự kiện đề xuất các bài nói chuyện (chủ đề) cho một sự kiện, sau đó có thể được phê duyệt (hoặc từ chối).
Cấu hình
Trước tiên, có một số cài đặt cần được kích hoạt để tận dụng tối đa các chủ đề sự kiện.
Để thực hiện việc này, hãy điều hướng đến , và tích vào hộp kiểm bên cạnh cài đặt Lịch trình & Chủ đề. Thao tác này cung cấp khả năng quản lý và xuất bản lịch trình sự kiện với nhiều chủ đề khác nhau.
Ngoài ra, khi hộp kiểm cài đặt đó được tích, hai tùy chọn cài đặt bổ sung sẽ xuất hiện bên dưới nó: Phát sóng trực tiếp và Gamification sự kiện.
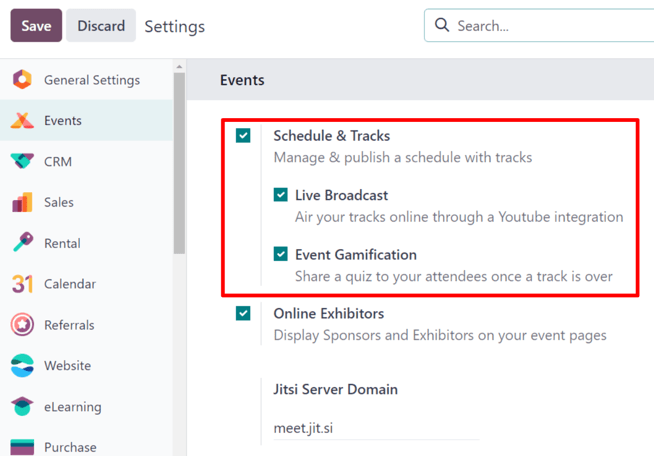
Tùy chọn Phát sóng trực tiếp cung cấp khả năng phát sóng trực tuyến các chủ đề thông qua tích hợp YouTube.
Tùy chọn Gamification sự kiện cung cấp khả năng chia sẻ câu đố với người tham dự chủ đề sau khi chủ đề kết thúc, nhằm kiểm tra mức độ tiếp thu của họ.
Ghi chú
Khi cài đặt Gamification sự kiện được bật, nút Thêm câu đố sẽ xuất hiện trên các biểu mẫu chủ đề, cung cấp khả năng nhanh chóng tạo câu đố dành riêng cho nội dung liên quan đến chủ đề cụ thể đó.
Sau khi tất cả các cài đặt mong muốn đã được bật, hãy nhớ nhấp vào nút Lưu ở góc trên bên trái của trang Cài đặt.
Trang Chủ đề sự kiện
Để truy cập, sửa đổi và/hoặc tạo các chủ đề cho một sự kiện, trước tiên hãy điều hướng đến một sự kiện đã được cấu hình sẵn, hoặc tạo một sự kiện mới từ ứng dụng Sự kiện.
Để thực hiện việc này, hãy điều hướng đến , và chọn một sự kiện đã có từ bảng điều khiển Sự kiện, hoặc tạo một sự kiện mới bằng cách nhấp vào Mới.
Khi đã ở trên biểu mẫu sự kiện mong muốn, hãy nhấp vào nút thông minh Chủ đề ở đầu biểu mẫu.
Mẹo
Nếu nút thông minh Chủ đề không hiển thị sẵn, hãy nhấp vào menu thả xuống Thêm để hiển thị các nút thông minh bị ẩn. Sau đó, nhấp vào Chủ đề từ menu thả xuống xuất hiện.
Nhấp vào nút thông minh Chủ đề sẽ hiển thị trang Chủ đề sự kiện cho sự kiện cụ thể đó, trình bày tất cả các chủ đề (cả đã lên lịch và được đề xuất) của sự kiện, nếu có.
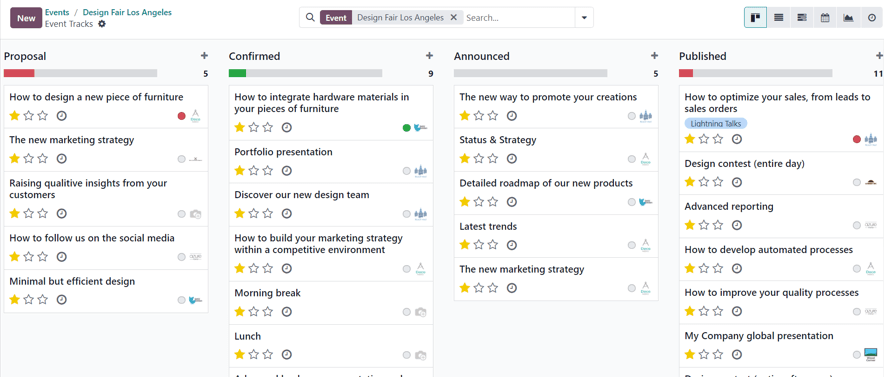
Các chủ đề được trình bày ở chế độ xem mặc định (Kanban), nhưng cũng có tùy chọn xem các chủ đề này ở chế độ xem (Danh sách), biểu đồ (Gantt), chế độ xem (Lịch), (Biểu đồ), hoặc (Hoạt động). Tất cả các chế độ xem này đều có thể truy cập ở góc trên bên phải của trang Chủ đề.
Trong chế độ xem mặc định (Kanban), các chủ đề được phân loại thành các giai đoạn khác nhau. Các giai đoạn mặc định là: Đề xuất, Đã xác nhận, Đã công bố, Đã xuất bản, Bị từ chối (giai đoạn thu gọn), và Đã hủy (giai đoạn thu gọn). Tất cả các giai đoạn này đều có thể được chỉnh sửa nếu cần.
Mẹo
Để chỉnh sửa một giai đoạn, hãy di chuột qua tên giai đoạn, nhấp vào biểu tượng (Cài đặt), và chọn Chỉnh sửa từ menu thả xuống xuất hiện.
Nhấp vào một chủ đề từ trang Chủ đề sự kiện sẽ mở ra biểu mẫu chủ đề cho chủ đề cụ thể đó.
Tạo chủ đề sự kiện
Từ trang Chủ đề sự kiện, nhấp vào Mới ở góc trên bên trái để hiển thị biểu mẫu chủ đề sự kiện trống nhằm tạo chủ đề sự kiện.
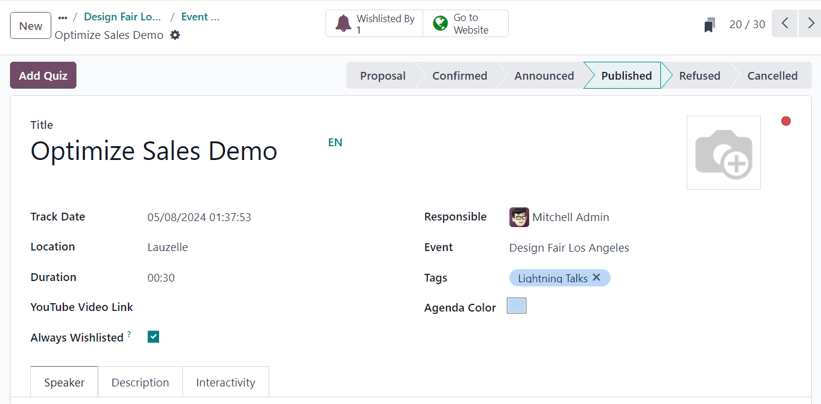
Bắt đầu bằng cách đặt cho chủ đề này một Tiêu đề. Trường này là bắt buộc trong Odoo.
Sau đó, nếu muốn, bạn có thể thêm ảnh minh họa cho nội dung bằng cách nhấp vào biểu tượng (bút chì) xuất hiện khi di chuột qua biểu tượng (máy ảnh) ở góc trên bên phải của biểu mẫu. Khi nhấp vào, hãy tải lên hình ảnh mong muốn cho nội dung. Hình ảnh này sẽ xuất hiện trên front-end của trang web sự kiện, tại trang web dành riêng cho nội dung này.
Tiếp theo, nhập Ngày chủ đề và thời gian cho chủ đề, đồng thời chỉ định Địa điểm dự kiến tổ chức bài nói chuyện.
Mẹo
Để truy cập danh sách đầy đủ các địa điểm cho chủ đề sự kiện, có thể được chỉnh sửa (và bổ sung) bất cứ lúc nào, điều hướng đến .
Sau đó, thêm Thời lượng cho chủ đề (tính bằng phút).
Nếu cài đặt Phát sóng trực tiếp đã được bật trong phần cài đặt của ứng dụng Sự kiện, tùy chọn thêm liên kết tương ứng trong trường Liên kết video YouTube sẽ khả dụng.
Nếu hộp kiểm Luôn trong danh sách yêu thích được tích, bài nói chuyện sẽ tự động được đặt làm mục yêu thích cho mỗi người tham dự sự kiện đã đăng ký.
Chỉ định một người chịu trách nhiệm quản lý chủ đề này trong trường Người phụ trách. Theo mặc định, người ban đầu tạo chủ đề sẽ được chỉ định.
Sau đó, đảm bảo chủ đề được áp dụng cho đúng sự kiện trong trường Sự kiện. Theo mặc định, trường này được tự động điền sự kiện liên quan đến trang Chủ đề sự kiện nơi chủ đề này ban đầu được tạo ra.
Tiếp theo, chọn thêm các thẻ hiện có hoặc tạo các thẻ mới để phân loại chủ đề rõ hơn. Các thẻ này cùng danh mục thẻ tương ứng của chúng được sử dụng trên trang web cụ thể của sự kiện - chủ yếu trên trang web Chủ đề (Talks) của trang web sự kiện, thông qua các menu bộ lọc thả xuống.
Bên dưới phần thông tin chung đó, có ba tab: Diễn giả, Mô tả, và Tương tác.
Tab diễn giả
Tab Diễn giả trên biểu mẫu chủ đề sự kiện bao gồm nhiều trường khác nhau liên quan đến diễn giả cụ thể dự kiến sẽ trình bày/chủ trì chủ đề.
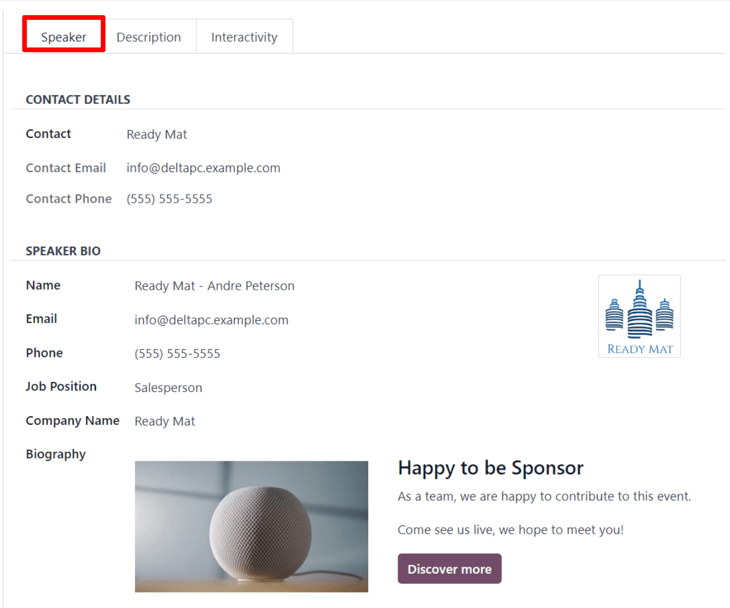
Phần Thông tin Liên hệ
Trong phần Thông tin liên hệ, hãy sử dụng trường thả xuống Liên hệ để chọn một liên hệ hiện có từ cơ sở dữ liệu làm đầu mối liên hệ chính cho bài nói chuyện.
Nếu liên hệ này chưa có trong cơ sở dữ liệu, hãy nhập tên của liên hệ và nhấp vào Tạo để tạo và chỉnh sửa biểu mẫu liên hệ sau, hoặc nhấp vào Tạo và chỉnh sửa... để chuyển đến biểu mẫu liên hệ mới đó, nơi bạn có thể nhập phần còn lại của thông tin liên quan.
Các trường Email liên hệ và Số điện thoại liên hệ bị làm mờ và được điền thông tin tìm thấy trên biểu mẫu liên hệ của liên hệ đã chọn đó. Không thể sửa đổi các trường này sau khi trường Liên hệ đã được chọn.
Phần Tiểu sử Diễn giả
Trong phần Tiểu sử diễn giả, hãy nhập thông tin liên quan đến diễn giả cụ thể được lên lịch trình bày/chủ trì chủ đề. Phần này có thể tự động điền dựa trên Liên hệ được chọn trong phần Thông tin liên hệ. Nếu không, hãy nhập thông tin vào các trường cần thiết.
Ghi chú
Thông tin này xuất hiện trên giao diện người dùng của trang web sự kiện, trên trang web chủ đề cụ thể, cung cấp thêm thông tin về diễn giả cho những người tham dự chủ đề.
Bắt đầu bằng cách nhập Tên, Email, và số Điện thoại cho diễn giả.
Tiếp theo, nếu muốn, hãy thêm hình ảnh xuất hiện cùng với tiểu sử diễn giả trên trang web sự kiện, thông qua biểu tượng (bút chì) xuất hiện khi con trỏ di chuột qua biểu tượng (máy ảnh). Khi nhấp vào, hãy tiến hành tải lên hình ảnh mong muốn cho diễn giả.
Sau đó, nhập Vị trí công việc cho diễn giả được chỉ định, tiếp theo là Tên công ty liên quan đến diễn giả.
Trong trường Tiểu sử, hãy nhập tiểu sử tùy chỉnh với mọi thông tin liên quan đến diễn giả.
Tab mô tả
Tab Mô tả của biểu mẫu chủ đề sự kiện là một trường văn bản trống, trong đó có thể nhập mô tả về chủ đề. Thông tin được nhập ở đây sẽ xuất hiện trên trang chủ đề cụ thể trên trang web sự kiện.
Tab Tương tác
Tab Tương tác trên biểu mẫu chủ đề sự kiện ban đầu chỉ có một tùy chọn duy nhất: Nút thần kỳ.
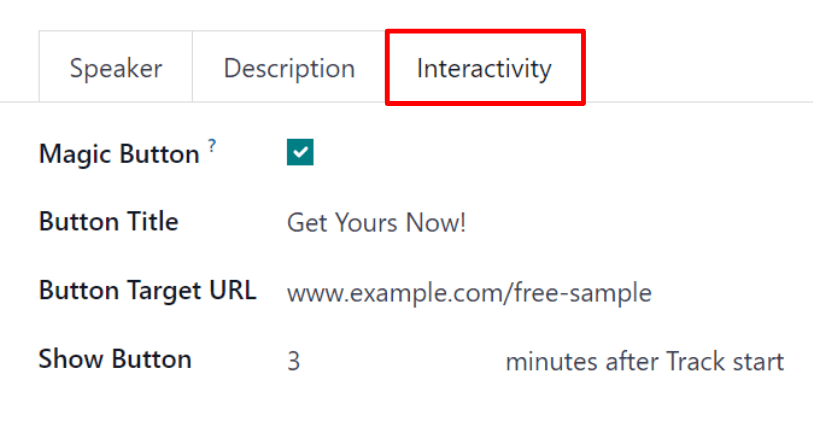
Khi tích vào hộp kiểm bên cạnh Nút thần kỳ, Odoo sẽ hiển thị nút kêu gọi hành động cho người tham dự trên thanh bên của chủ đề trong khi chủ đề đang diễn ra.
Khi hộp kiểm đó được tích, ba tùy chọn khác sẽ xuất hiện, tất cả đều liên quan đến Nút thần kỳ:
Tiêu đề nút: nhập tiêu đề xuất hiện trên nút dành cho người tham dự.
URL mục tiêu của nút: nhập URL dẫn người tham dự nhấp vào nút đến một trang cụ thể.
Hiển thị nút: nhập một số vào trường, và nút sẽ xuất hiện sau số phút sau khi bắt đầu Chủ đề đó.
Ghi chú
Nút thần kỳ chỉ xuất hiện nếu có nhiều hơn một bản theo dõi đã được xuất bản.
Nút Thêm câu đố
Nút Thêm câu đố chỉ xuất hiện trên các biểu mẫu chủ đề sự kiện nếu cài đặt Gamification sự kiện được bật trong phần cài đặt Sự kiện của Odoo.
Để thêm câu đố vào chủ đề sự kiện, hãy nhấp vào nút Thêm câu đố. Thao tác này sẽ mở ra một trang riêng biệt nơi có thể tạo và định cấu hình câu đố cho chủ đề sự kiện.
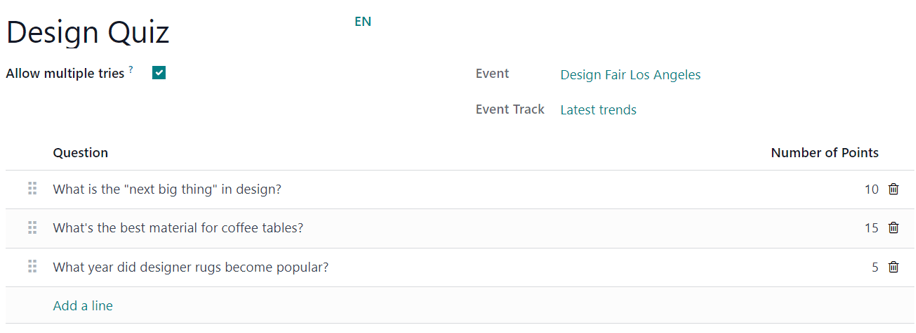
Bắt đầu bằng cách nhập tiêu đề cho câu đố vào trường trống ở đầu trang. Sau đó, nếu muốn cho phép người tham gia làm câu đố nhiều lần, hãy tích vào hộp kiểm bên cạnh Cho phép thử nhiều lần.
Các trường Sự kiện và Chủ đề sự kiện không thể chỉnh sửa, và hiển thị sự kiện cùng chủ đề tương ứng liên kết với câu đố này.
Để thêm câu hỏi vào câu đố, nhấp Thêm dòng bên dưới cột Câu hỏi. Thao tác này sẽ hiển thị cửa sổ bật lên Tạo câu hỏi.
Ghi chú
Tất cả câu hỏi trong câu đố theo dõi đều là câu hỏi trắc nghiệm.
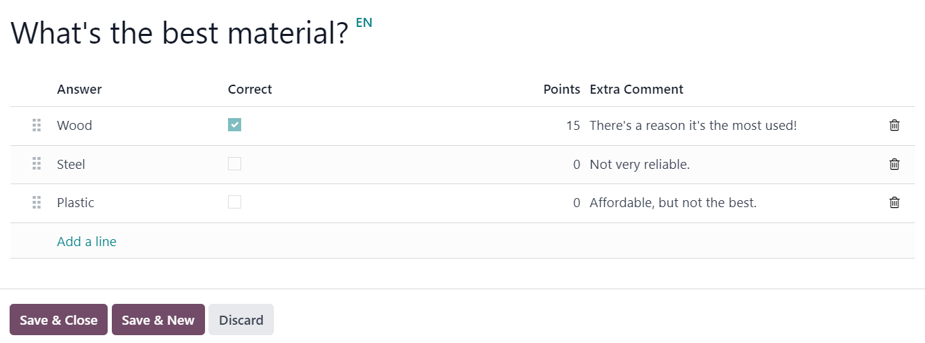
Từ cửa sổ bật lên, hãy nhập câu hỏi vào trường trống ở trên cùng. Sau đó, nhấp vào Thêm dòng để thêm các tùy chọn câu trả lời. Khi nhấp vào Thêm dòng, một dòng mới sẽ xuất hiện để có thể nhập tùy chọn câu trả lời.
Khi đã nhập một tùy chọn câu trả lời, hãy xác định xem đó có phải là câu trả lời Đúng hay không bằng cách tích vào hộp kiểm trong cột Đúng.
Sau đó, có tùy chọn thêm giá trị điểm trong cột Điểm.
Và nếu có bất kỳ nhận xét bổ sung nào đi kèm với tùy chọn câu trả lời, hãy nhập chúng vào trường Bình luận thêm.
Ghi chú
Các trường Đúng, Điểm, và Bình luận thêm đều là tùy chọn.
Lặp lại quy trình này cho tất cả các tùy chọn câu trả lời.
Để xóa một tùy chọn câu trả lời, hãy nhấp vào biểu tượng (thùng rác) ở ngoài cùng bên phải.
Sau khi hoàn tất tất cả các tùy chọn câu trả lời mong muốn (và cấu hình của chúng), hãy nhấp vào Lưu & Đóng để lưu câu hỏi, đóng cửa sổ bật lên và quay lại biểu mẫu câu đố của chủ đề. Hoặc nhấp vào Lưu & Thêm mới để lưu câu hỏi này và bắt đầu tạo ngay một câu hỏi khác trên biểu mẫu bật lên Tạo câu hỏi mới.
Để xóa bất kỳ câu hỏi nào khỏi câu đố, hãy nhấp vào biểu tượng (thùng rác) ở ngoài cùng bên phải của dòng câu hỏi.
Xuất bản bản theo dõi sự kiện
Sau khi hoàn tất tất cả các cấu hình mong muốn trên biểu mẫu chủ đề sự kiện, hãy nhấp vào giai đoạn mong muốn từ thanh trạng thái ở góc trên bên phải (ví dụ: Đã xác nhận, Đã công bố, v.v.).
Ghi chú
Giai đoạn của bản theo dõi cũng có thể được thay đổi từ trang Theo dõi sự kiện, nơi thẻ theo dõi mong muốn có thể được kéo và thả vào giai đoạn Kanban thích hợp.
Nếu một chủ đề sự kiện chưa được xuất bản và nó được chuyển sang giai đoạn Đã xuất bản, Odoo sẽ tự động xuất bản chủ đề đó trên trang web sự kiện.
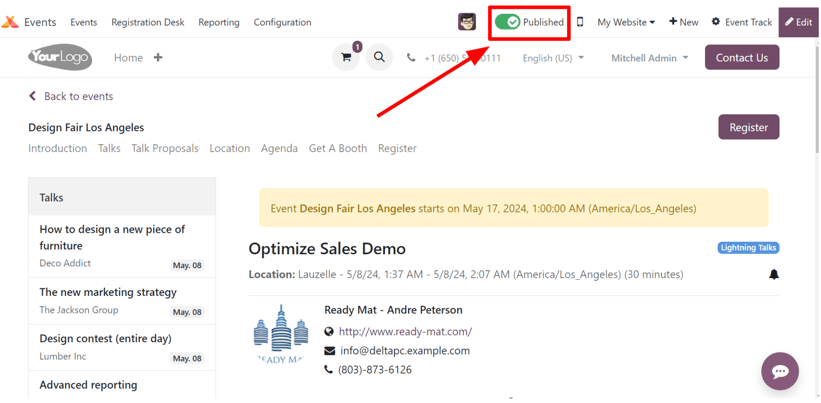
Một phần nội dung của sự kiện cũng có thể được công bố bằng cách mở biểu mẫu nội dung sự kiện mong muốn, rồi nhấp vào nút thông minh Đi đến trang web. Sau đó, để người tham dự có thể xem và truy cập trang của phần nội dung này, hãy chuyển nút Đã huỷ đăng ở đầu trang sang trạng thái Đã đăng; thao tác này sẽ đổi màu từ đỏ sang xanh lá, và giúp người tham dự có thể truy cập được nội dung.