
Tạo sự kiện
Với ứng dụng Sự kiện, ban tổ chức sự kiện có thể tạo và cấu hình các sự kiện trực tiếp hoặc chỉ trực tuyến trong Odoo. Mỗi sự kiện mới chứa nhiều tùy chọn có thể tùy chỉnh xoay quanh các công tác hậu cần cụ thể của sự kiện, tùy theo nhu cầu của từng sự kiện, chẳng hạn như bán vé và bàn đăng ký, gian hàng, chủ đề, nhà tài trợ, phòng họp, v.v.
Sự kiện có thể được tạo thủ công từ đầu hoặc dựa trên các mẫu có sẵn. Sau khi được khởi chạy, ứng dụng Sự kiện sẽ tích hợp với ứng dụng Trang web để quảng bá và đăng ký sự kiện từ front-end, ứng dụng Bán hàng để hỗ trợ mua vé nếu sự kiện có thu phí, cũng như ứng dụng CRM thông qua các quy tắc tạo khách hàng tiềm năng có thể tùy chỉnh.
Sự kiện mới
Để tạo sự kiện mới, trước tiên hãy đi đến để truy cập trang chủ mặc định Sự kiện ở chế độ xem Kanban. Từ đây, hoặc có thể từ chế độ xem Danh sách hoặc Gantt, nhấp vào nút Mới ở góc trên bên trái của trang chủ để mở biểu mẫu sự kiện mới.
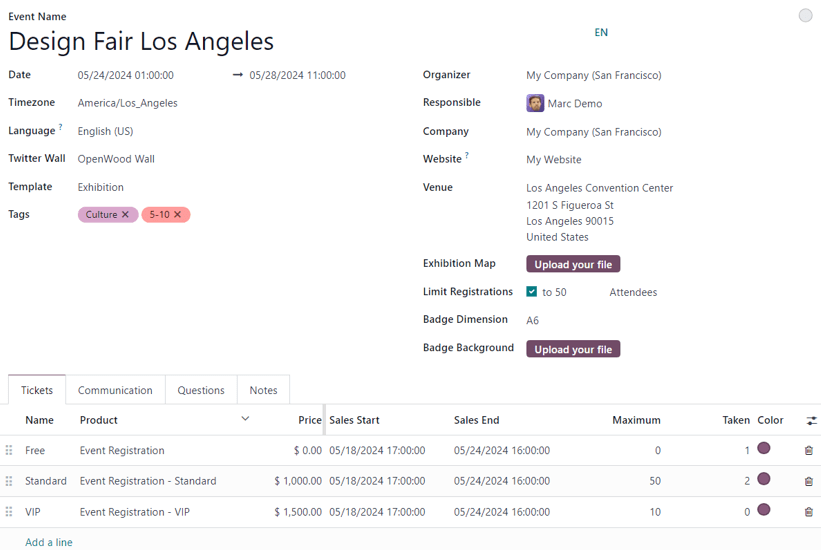
Ghi chú
Nếu một số trường nhất định không xuất hiện sẵn trên biểu mẫu sự kiện, điều đó có nghĩa là cần phải cài đặt một ứng dụng bổ sung, hoặc cơ sở dữ liệu không hoạt động trong môi trường đa công ty.
Ví dụ: trường Twitter Wall chỉ xuất hiện nếu ứng dụng Marketing trên Mạng xã hội được cài đặt, và trường Công ty chỉ xuất hiện nếu cơ sở dữ liệu đang hoạt động trong môi trường đa công ty.
Đây chỉ là các yếu tố bổ sung có thể được sử dụng cho một sự kiện. Chúng không bắt buộc để tạo, tổ chức và quản lý một sự kiện bằng Odoo Sự kiện.
Biểu mẫu sự kiện
Ở đầu biểu mẫu sự kiện là một loạt các nút thông minh liên quan đến các chỉ số sự kiện khác nhau, các nút này sẽ tự động điền dữ liệu thích hợp khi người tham dự bắt đầu đăng ký, gian hàng và nhà tài trợ đăng ký tham gia sự kiện, sự kiện diễn ra, v.v.
Chủ yếu, các nút thông minh này được sử dụng làm các cổng hậu cần để thực hiện các hành động cụ thể cho sự kiện. Các hiển thị dạng số chủ yếu đóng vai trò là điểm tham chiếu nhanh.
Mặc dù các chỉ số trực quan đó rất hữu ích, bạn vẫn có thể nhấp vào chúng và sử dụng để điều hướng đến các trang cụ thể liên quan đến sự kiện nhằm sửa đổi và/hoặc thực hiện bất kỳ hành động mong muốn nào.
Bên dưới các nút thông minh là biểu mẫu sự kiện, chứa nhiều trường khác nhau và các tab có thể nhấp vào để cấu hình các chi tiết ban đầu, cần thiết của sự kiện.
Dưới đây là các trường có trên biểu mẫu sự kiện:
Tên sự kiện: tiêu đề của sự kiện. Trường này là bắt buộc.
Ghi chú
Ở bên phải của Tên sự kiện đã nhập, có một chú giải công cụ ngôn ngữ, được biểu thị bằng chỉ báo ngôn ngữ viết tắt (ví dụ:
EN). Khi nhấp vào, một cửa sổ bật lên Translate: name sẽ xuất hiện, hiển thị các tùy chọn dịch ngôn ngữ được cấu hình sẵn khác nhau có sẵn trong cơ sở dữ liệu.Ngày: thời gian sự kiện dự kiến diễn ra (được biểu thị theo múi giờ địa phương của bạn). Trường này được tự động điền nhưng có thể sửa đổi, và là bắt buộc.
Múi giờ hiển thị: múi giờ mà ngày/giờ sự kiện sẽ được hiển thị trên trang web. Trường này được tự động điền nhưng có thể sửa đổi, và là bắt buộc.
Ngôn ngữ: chỉ định một ngôn ngữ cụ thể để dịch tất cả các thông tin liên lạc về sự kiện sang ngôn ngữ đó, nếu cần thiết. Theo mặc định, trường này để trống, vì vậy nếu thông tin liên lạc liên quan đến sự kiện được gửi đến những người nhận nói ngôn ngữ khác, hãy đảm bảo cấu hình trường này một cách chính xác.
Twitter Wall: tạo một trang riêng biệt trên trang web sự kiện để làm nổi bật các bài đăng mạng xã hội cụ thể trên X (trước đây là Twitter) có chứa các yếu tố mong muốn đã được xác định trước.
Mẹo
Để tạo và tùy chỉnh một Twitter Wall, hãy nhập tên của tường mong muốn vào trường này và chọn Tạo và chỉnh sửa... từ menu thả xuống xuất hiện.
Thao tác này sẽ hiển thị cửa sổ bật lên Tạo Twitter Wall.
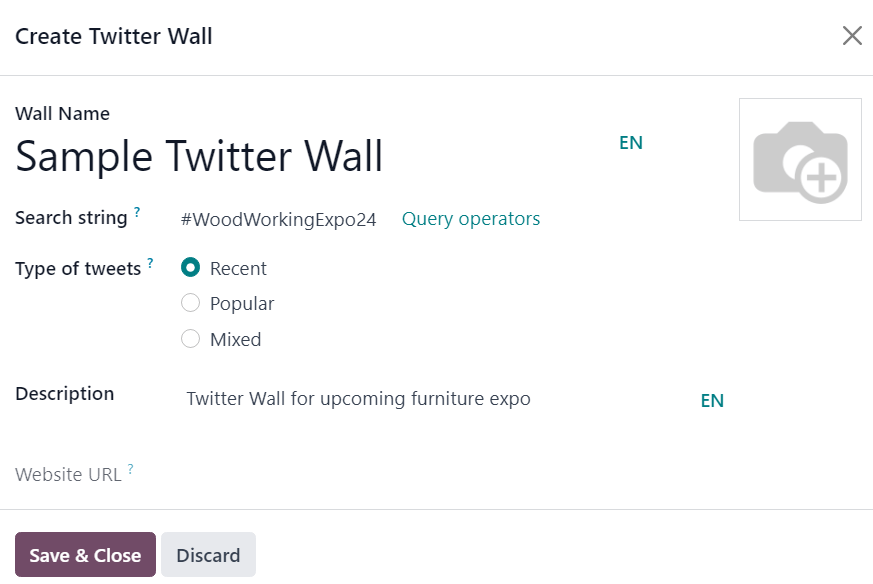
Từ cửa sổ này, hãy nhập Tên tường. Sau đó, chọn một từ hoặc hashtag nhất định để Odoo tìm kiếm trên X, ví dụ như
#WoodWorkingExpo24.Tiếp theo, hãy xác định Loại tweet mà Odoo sẽ hiển thị theo tiêu chí đã xác định trước đó. Các lựa chọn trong trường này là: Gần đây, Phổ biến, hoặc Hỗn hợp.
Người dùng cũng có tùy chọn thêm Mô tả ngắn gọn cho tường.
Cuối cùng, trường URL trang web bị làm mờ, không thể sửa đổi sẽ tự động điền URL đầy đủ cần thiết để truy cập tài liệu qua trang web sự kiện.
Hình ảnh cũng có thể được thêm vào tường bằng cách nhấp vào biểu tượng (bút chì) xuất hiện khi con trỏ di chuột qua hình ảnh giữ chỗ (máy ảnh) ở góc trên bên phải của cửa sổ bật lên.
Sau đó, từ cửa sổ trình duyệt tệp xuất hiện, hãy chọn hình ảnh mong muốn để thêm vào tường.
Trường Twitter Wall này chỉ xuất hiện trên biểu mẫu sự kiện nếu ứng dụng Marketing trên Mạng xã hội được cài đặt và một tài khoản X đã được thêm dưới dạng luồng trên ứng dụng. Để tìm hiểu thêm, hãy xem tài liệu Marketing trên Mạng xã hội.
Mẫu: chọn một mẫu sự kiện đã được cấu hình sẵn từ menu thả xuống xuất hiện.
Hoặc tạo một mẫu mới trực tiếp từ trường này bằng cách nhập tên của mẫu mới và chọn một trong hai tùy chọn:
Tạo (tạo mẫu và có thể chỉnh sửa sau) hoặc
Tạo và chỉnh sửa... (tạo mẫu và mở ra một trang mẫu riêng biệt để cấu hình mẫu chi tiết hơn).
Thẻ: thêm bất kỳ thẻ tương ứng nào để mô tả ngắn gọn về sự kiện (ví dụ:
Online,Hội nghị, v.v.). Có thể thêm nhiều thẻ cho mỗi sự kiện.Mẹo
Thẻ có thể được hiển thị trên các sự kiện được liệt kê trên trang web bằng cách tích vào hộp kiểm Hiển thị trên Trang web từ .
Người tổ chức: chỉ định người tổ chức sự kiện (công ty, liên hệ hoặc nhân viên).
Người phụ trách: chỉ định một người dùng trong cơ sở dữ liệu chịu trách nhiệm về sự kiện này.
Công ty: chỉ định công ty trong cơ sở dữ liệu có liên quan đến sự kiện này. Trường này chỉ xuất hiện nếu làm việc trong môi trường đa công ty. Trường này được tự động điền nhưng có thể sửa đổi, và là bắt buộc.
Trang web: chọn giới hạn việc xuất bản sự kiện này cho một trang web cụ thể được tạo trong Odoo. Nếu trường này để trống, sự kiện có thể được xuất bản trên tất cả các trang web trong cơ sở dữ liệu. Để tìm hiểu thêm, hãy tham khảo tài liệu Nhiều trang web.
Địa điểm: nhập chi tiết địa điểm tổ chức sự kiện. Trường này lấy thông tin thích hợp từ ứng dụng Danh bạ. Ngoài ra, thông tin Địa điểm cũng có thể được thêm thủ công vào trường này. Tối thiểu phải nhập tên địa điểm, địa chỉ, thành phố, mã bưu chính/khu vực và quốc gia.
Bản đồ triển lãm: nếu muốn, hãy nhấp vào nút Tải tệp của bạn lên để tải lên hình ảnh bản đồ địa điểm tổ chức sự kiện.
Giới hạn đăng ký: nếu tích vào hộp kiểm này, số lượng đăng ký sẽ bị giới hạn cho sự kiện, và số lượng giới hạn mong muốn đó phải được nhập vào trường trống trước Người tham dự.
Kích thước huy hiệu: chọn kích thước định dạng giấy mong muốn cho huy hiệu sự kiện. Các tùy chọn là: A4 gấp lại, A6, hoặc 4 trên một tờ.
Hình nền huy hiệu: nếu muốn, hãy nhấp vào nút Tải tệp của bạn lên để tải lên hình nền tùy chỉnh cho huy hiệu sự kiện.
Khi các trường trên trong biểu mẫu sự kiện đã được điền đầy đủ, hãy chuyển sang bốn tab ở cuối biểu mẫu sự kiện để tùy chỉnh thêm.
Tab Vé
Tạo các vé tùy chỉnh (và các hạng vé) cho sự kiện trong tab Vé của biểu mẫu sự kiện.
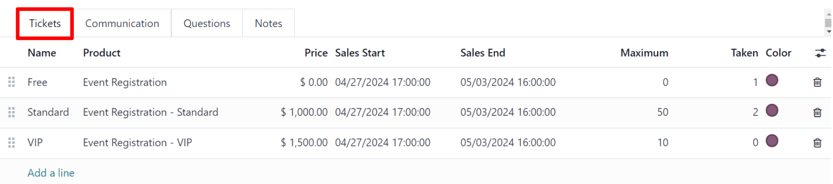
Để tạo vé, hãy nhấp vào Thêm dòng trong tab Vé. Sau đó, nhập tên cho vé (ví dụ: Vé cơ bản hoặc VIP) vào trường Tên.
Trong trường Sản phẩm, hãy chọn sản phẩm Đăng ký sự kiện đã được cấu hình sẵn, hoặc tạo sản phẩm mới bằng cách nhập tên sản phẩm đăng ký sự kiện mới, rồi chọn Tạo hoặc Tạo và chỉnh sửa... từ menu thả xuống xuất hiện.
Quan trọng
Khi cài đặt Odoo Sự kiện, một loại sản phẩm mới, Vé sự kiện, sẽ khả dụng trên các biểu mẫu sản phẩm (). Để sản phẩm đăng ký sự kiện có thể chọn được trong tab Vé, Loại sản phẩm đăng ký sự kiện phải được đặt thành Vé sự kiện.
Mẹo
Các sản phẩm đăng ký sự kiện hiện có cũng có thể được sửa đổi trực tiếp từ trường này bằng cách nhấp vào biểu tượng (mũi tên phải) nằm cạnh sản phẩm đăng ký sự kiện. Thao tác này sẽ mở ra biểu mẫu của sản phẩm đó. Nếu ứng dụng Kho vận được cài đặt, các tùy chọn bổ sung sẽ khả dụng để tùy chỉnh cho sản phẩm.
Tiếp theo, đặt chi phí đăng ký của vé trong trường Giá.
Ghi chú
Giá bán được xác định trên biểu mẫu sản phẩm của sản phẩm đăng ký sự kiện sẽ thiết lập chi phí mặc định của vé. Việc sửa đổi Giá của vé trong tab Vé sẽ đặt chi phí đăng ký mới của vé cho sự kiện đó.
Tiếp theo, hãy xác định ngày Bắt đầu bán và Kết thúc bán trong các trường tương ứng. Để thực hiện việc này, hãy nhấp vào trường trống để hiển thị cửa sổ bật lên lịch. Từ đó, chọn ngày và giờ mong muốn, sau đó nhấp vào Áp dụng.
Sau đó, nếu muốn, chỉ định số lượng Tối đa của loại vé cụ thể đó có thể được bán.
Cột Đã bán sẽ được điền số lượng vé đã bán.
Tùy chọn, trong cột Màu sắc, hãy thêm màu tùy chỉnh để phân biệt các huy hiệu vé. Màu đã chọn sẽ hiển thị trên huy hiệu vé khi in.
Để xóa bất kỳ vé nào khỏi tab Vé, hãy nhấp vào biểu tượng (thùng rác) trên dòng tương ứng của vé cần xóa.
Mẹo
Để thêm cột Mô tả tùy chọn vào tab Vé, nhấp vào menu thả xuống (tùy chọn bổ sung), nằm ở phía bên phải của các tiêu đề cột.
Sau đó, đánh dấu vào ô chọn bên cạnh Mô tả từ menu thả xuống hiển thị.
Khi được thêm vào, tùy chọn thêm mô tả ngắn cho từng vé sự kiện sẽ xuất hiện, có thể được sử dụng để thông báo cho người tham dự về bất kỳ ưu đãi hoặc tiện nghi nào có thể đi kèm với các giao dịch mua vé cụ thể.
Thẻ Giao tiếp
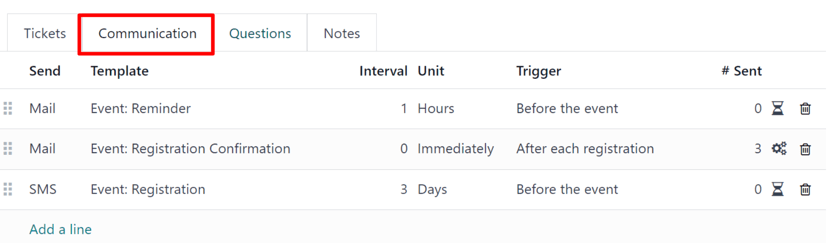
Trong tab Giao tiếp của biểu mẫu sự kiện, hãy tạo các thông tin truyền thông tiếp thị khác nhau có thể được lên lịch gửi vào các khoảng thời gian cụ thể trước và sau sự kiện.
Ghi chú
Theo mặc định, Odoo cung cấp ba mẫu thông tin liên lạc riêng biệt cấu hình sẵn trên mỗi biểu mẫu sự kiện mới. Một trong số đó là email được gửi sau mỗi lượt đăng ký để xác nhận việc mua vé với người tham dự. Hai mẫu còn lại là email nhắc sự kiện, được lên lịch gửi tại các khoảng thời gian khác nhau trước khi sự kiện diễn ra để nhắc nhở người nhận về sự kiện sắp tới.
Để thêm một thông tin liên lạc trong tab Giao tiếp, nhấp vào Thêm dòng. Sau đó, chọn loại thông tin liên lạc mong muốn trong trường Gửi. Các tùy chọn là: Thư, SMS, Bài đăng Mạng xã hội, hoặc WhatsApp.
Không có giới hạn về số lượng thông tin liên lạc có thể được thêm vào trong tab Giao tiếp của biểu mẫu sự kiện.
Để xóa một thông tin liên lạc khỏi tab Giao tiếp, hãy nhấp vào biểu tượng (thùng rác) trên dòng thông tin liên lạc tương ứng. Thao tác này sẽ xóa hoàn toàn thông tin liên lạc đó khỏi sự kiện.
Quan trọng
Tùy chọn Bài đăng Mạng xã hội chỉ xuất hiện nếu ứng dụng Marketing trên Mạng xã hội được cài đặt. Tùy chọn WhatsApp chỉ xuất hiện nếu mô-đun Tích hợp WhatsApp được cài đặt.
Các mẫu WhatsApp không thể được chỉnh sửa trong quá trình cấu hình đang hoạt động. Cần có sự phê duyệt riêng từ Meta.
Mail
Chọn một mẫu email hiện có từ menu thả xuống Mẫu.
Tiếp theo, xác định Khoảng thời gian, Đơn vị, và Kích hoạt từ các trường thả xuống tương ứng của chúng, để cho Odoo biết thời điểm thông tin liên lạc sẽ được gửi.
Các tùy chọn Đơn vị là: Ngay lập tức, Giờ, Ngày, Tuần, và Tháng.
Sau đó, chọn một tùy chọn từ menu thả xuống Kích hoạt. Các tùy chọn bao gồm: Sau mỗi lần đăng ký, Trước sự kiện và Sau sự kiện.
Cột Đã gửi sẽ được điền số lượng thông tin liên lạc đã gửi. Và bên cạnh con số đó là các biểu tượng khác nhau xuất hiện tùy thuộc vào trạng thái của thông tin liên lạc cụ thể đó.
Trạng thái Đang chạy được biểu thị bằng biểu tượng (ba bánh răng). Trạng thái Đã gửi được biểu thị bằng biểu tượng (dấu tích). Và trạng thái Đã lên lịch được biểu thị bằng biểu tượng (đồng hồ cát).
Example
Để gửi email xác nhận một giờ sau khi người tham dự đăng ký sự kiện, hãy cấu hình giao tiếp sau:
Khoảng thời gian:
1Đơn vị: Giờ
Kích hoạt: Sau mỗi lần đăng ký
Ghi chú
Các mẫu email hiện có có thể được sửa đổi trực tiếp từ menu thả xuống Mẫu, nếu cần, bằng cách nhấp vào biểu tượng (mũi tên phải) bên cạnh tên mẫu. Thao tác này sẽ mở ra một trang riêng biệt nơi người dùng có thể chỉnh sửa Nội dung, Cấu hình email, và Cài đặt của mẫu email cụ thể đó.
Để xem và quản lý tất cả các mẫu email, hãy kích hoạt Chế độ lập trình viên (chế độ gỡ lỗi) và điều hướng đến . Chỉnh sửa cẩn thận vì các mẫu email ảnh hưởng đến tất cả các giao tiếp nơi mẫu được sử dụng.
Thẻ Câu hỏi
Trong thẻ Câu hỏi của biểu mẫu sự kiện, người dùng có thể tạo các bảng câu hỏi ngắn để người đăng ký tương tác và trả lời sau khi họ đăng ký sự kiện.
Những câu hỏi này có thể tập trung vào việc thu thập thông tin cơ bản về người tham dự, tìm hiểu về sở thích, kỳ vọng của họ và những điều tương tự. Thông tin này cũng có thể được sử dụng để tạo các chỉ số báo cáo chi tiết hơn, ngoài việc được sử dụng để tạo các quy tắc tạo khách hàng tiềm năng cụ thể.
Ghi chú
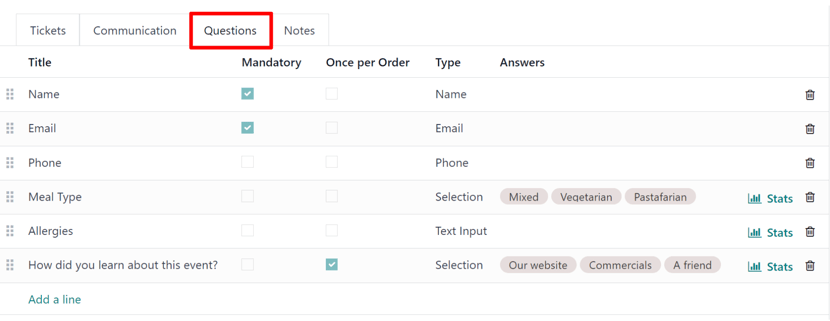
Theo mặc định, Odoo cung cấp ba câu hỏi trong tab Câu hỏi cho mọi biểu mẫu sự kiện. Các câu hỏi mặc định yêu cầu (những) người đăng ký cung cấp Tên và Email của họ, đồng thời tùy chọn việc có bao gồm số Điện thoại hay không.
Thông tin thu thập được từ tab Câu hỏi có thể tìm thấy trên bảng điều khiển Người tham dự, có thể truy cập qua nút thông minh Người tham dự. Odoo sẽ tạo các bản ghi riêng lẻ chứa thông tin cơ bản về (những) người đăng ký cũng như sở thích của họ.
Để thêm câu hỏi trong thẻ Câu hỏi, nhấp vào Thêm dòng. Làm như vậy sẽ hiển thị cửa sổ bật lên Tạo câu hỏi. Từ đây, người dùng có thể tạo và cấu hình câu hỏi của họ.
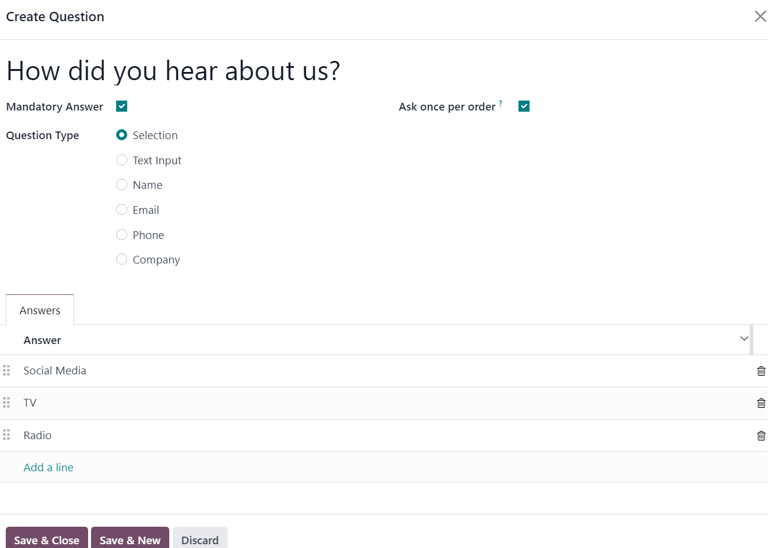
Đầu tiên, nhập câu hỏi vào trường ở đầu biểu mẫu. Sau đó, quyết định xem câu hỏi có yêu cầu Câu trả lời bắt buộc hay không và/hoặc Odoo có nên Hỏi một lần cho mỗi đơn hàng hay không bằng cách đánh dấu vào các ô tương ứng nếu muốn.
Nếu hộp kiểm Hỏi một lần cho mỗi lần đặt chỗ được tích, câu hỏi sẽ chỉ được hỏi một lần và giá trị của nó sẽ được áp dụng cho mọi người tham dự trong đơn hàng (nếu nhiều vé được mua cùng lúc). Nếu hộp kiểm này không được tích cho cài đặt này, Odoo sẽ hiển thị câu hỏi cho từng người tham dự liên quan đến đăng ký đó.
Tiếp theo, chọn một tùy chọn Loại câu hỏi:
Lựa chọn: cung cấp các tùy chọn câu trả lời cho câu hỏi để người đăng ký lựa chọn. Các tùy chọn câu trả lời có thể chọn được quản lý trong cột Câu trả lời ở cuối cửa sổ bật lên.
Nhập văn bản: cho phép người dùng nhập câu trả lời tùy chỉnh cho câu hỏi trong trường văn bản.
Tên: cung cấp cho người đăng ký một trường để họ nhập tên của mình.
Email: cung cấp cho người đăng ký một trường để họ nhập địa chỉ email của mình.
Điện thoại: cung cấp cho người đăng ký một trường để họ nhập số điện thoại của mình.
Công ty: cung cấp cho người đăng ký một trường để họ nhập công ty mà họ liên kết.
Sau khi tất cả các cấu hình mong muốn đã được nhập, nhấp vào Lưu & Đóng để lưu câu hỏi và quay lại thẻ Câu hỏi trên biểu mẫu sự kiện, hoặc nhấp vào Lưu & Tạo mới để lưu câu hỏi và ngay lập tức tạo một câu hỏi mới trên cửa sổ bật lên Tạo câu hỏi mới.
Khi các câu hỏi được thêm vào thẻ Câu hỏi, các cột thông tin sẽ hiển thị cấu hình của từng câu hỏi.
Các cột thông tin như sau:
Tiêu đề
Bắt buộc
Một lần cho mỗi đơn hàng
Loại
Câu trả lời (nếu có)
Đối với các loại Lựa chọn và Nhập văn bản, nút Thống kê xuất hiện ở phía bên phải của dòng câu hỏi. Khi được nhấp vào, Odoo hiển thị một trang riêng biệt, trình bày các chỉ số phản hồi cho câu hỏi cụ thể đó.
Để xóa bất kỳ câu hỏi nào khỏi tab Câu hỏi, hãy nhấp vào biểu tượng (thùng rác) trên dòng câu hỏi tương ứng.
Không có giới hạn về số lượng câu hỏi có thể được thêm vào trong tab Câu hỏi của biểu mẫu sự kiện.
Tab Ghi chú
Trong tab Ghi chú của biểu mẫu sự kiện, người dùng có thể để lại các ghi chú nội bộ chi tiết và/hoặc hướng dẫn/thông tin liên quan đến sự kiện cho người tham dự.
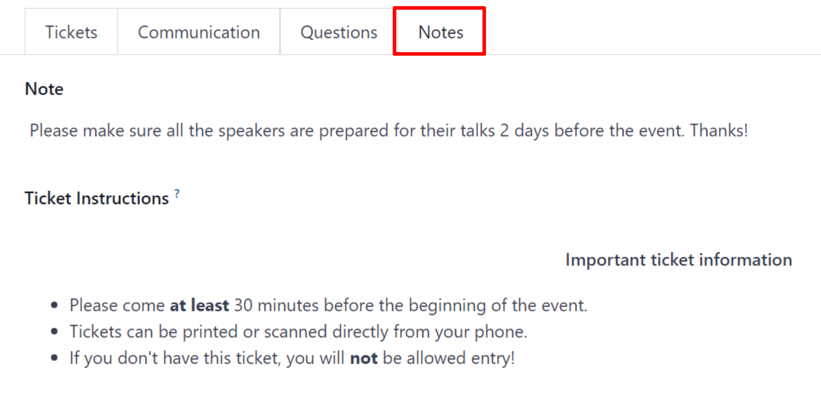
Trong trường Ghi chú của tab Ghi chú, người dùng có thể để lại ghi chú nội bộ cho các nhân viên sự kiện khác, chẳng hạn như danh sách "việc cần làm", thông tin liên hệ, hướng dẫn, v.v.
Trong trường Hướng dẫn vé của tab Ghi chú, người dùng có thể để lại các hướng dẫn cụ thể cho những người tham dự sự kiện xuất hiện trên vé của người tham dự.
Xuất bản sự kiện
Sau khi hoàn tất tất cả các cấu hình và chỉnh sửa trên biểu mẫu sự kiện, đã đến lúc xuất bản sự kiện lên trang web. Làm như vậy sẽ làm cho sự kiện hiển thị với khách truy cập trang web và cho phép mọi người đăng ký tham gia sự kiện.
Để xuất bản sự kiện sau khi hoàn tất tất cả các tùy chỉnh, hãy nhấp vào nút thông minh Đi đến trang web ở đầu biểu mẫu sự kiện. Làm như vậy sẽ hiển thị trang web của sự kiện, có thể được tùy chỉnh như bất kỳ trang web nào khác trên trang thông qua nút Chỉnh sửa.
Để tìm hiểu thêm về chức năng và các tùy chọn thiết kế trang web, hãy tham khảo tài liệu Khối dựng.
Khi trang web sự kiện đã sẵn sàng để chia sẻ, hãy nhấp vào công tắc chuyển đổi màu đỏ Chưa xuất bản trong menu tiêu đề, chuyển nó thành công tắc màu xanh lá cây Đã xuất bản. Tại thời điểm này, trang web sự kiện đã được xuất bản và tất cả khách truy cập trang web đều có thể xem/truy cập.
Gửi lời mời sự kiện
Để gửi lời mời sự kiện đến những người tham dự tiềm năng, hãy điều hướng đến biểu mẫu sự kiện mong muốn thông qua và nhấp vào sự kiện mong muốn. Sau đó, nhấp vào nút Mời ở góc trên bên trái của biểu mẫu sự kiện.
Làm như vậy sẽ hiển thị một biểu mẫu email trống để điền vào theo ý muốn. Để tìm hiểu thêm về cách tạo và tùy chỉnh email như thế này, hãy tham khảo tài liệu Tạo email.
Tiến hành tạo và tùy chỉnh một thông điệp email để gửi dưới dạng lời mời đến những người tham dự tiềm năng. Hãy nhớ đính kèm liên kết đến trang đăng ký trên trang web sự kiện, cho phép những người nhận quan tâm nhanh chóng đăng ký.
Mẹo
Gửi email từ Odoo bị giới hạn hàng ngày, mặc định là 200. Để tìm hiểu thêm về giới hạn hàng ngày, hãy truy cập tài liệu Đã đạt giới hạn hàng ngày.