
New vehicles
Odoo's Fleet app manages all vehicles, and the accompanying documentation that comes with vehicle maintenance, and drivers records.
Upon opening the application, all vehicles are organized within the Vehicles dashboard, which is the default dashboard for the Fleet application. Each vehicle is displayed in its corresponding Kanban stage, based on its status. The default stages are New Request, To Order, Registered, and Downgraded.
To add a new vehicle to the fleet from the Vehicles page, click the New button in the top-left corner, and a blank vehicle form loads. Then, proceed to enter the vehicle information on the vehicle form.
The form auto-saves as data is entered. However, the form can be saved manually at any time by clicking the save manually option, represented by a (cloud upload) icon, located in the top-left corner of the page.
Các trường biểu mẫu phương tiện
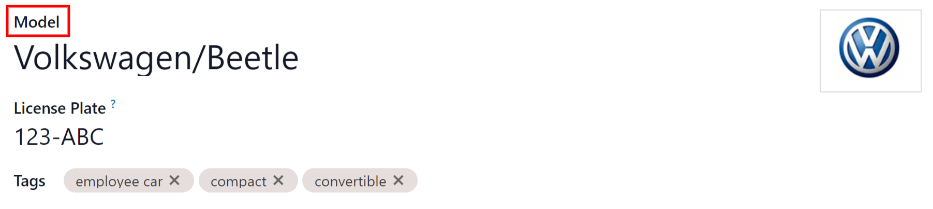
Model: select the vehicle's model from the drop-down menu. Once a model is selected, additional fields may appear on the form.
If the model is not listed, type in the model name, and click either Create "model", or Create and edit... to create a new model and edit the model details.
License Plate: enter the vehicle's license plate number in this field.
Tags: select any tags from the drop-down menu, or type in a new tag. There is no limit on the amount of tags that can be selected.
Ghi chú
The Model is the only required field on the new vehicle form. When a model is selected, other fields appear on the vehicle form, and relevant information auto-populates the fields that apply to the model. If some of the fields do not appear, this may indicate there is no model selected.
Driver section
Phần này của biểu mẫu phương tiện liên quan đến người hiện đang lái xe, cũng như bất kỳ kế hoạch nào để thay đổi người lái trong tương lai và khi nào.
Driver: select the driver from the drop-down menu, or type in a new driver and click either Create "driver" or Create and edit... to create a new driver, and edit the driver details.
Quan trọng
A driver does not have to be an employee. When creating a new driver, the driver is added to the Fleet application, not the Employees application.
If the Contacts application is installed, the driver information is also stored in the Contacts application.
Mobility Card: if the selected driver has a mobility card listed on their employee card in the Employees application, the mobility card number appears in this field. If there is no mobility card listed, and one should be added, edit the employee record in the Employees application.
Future Driver: if the next driver for the vehicle is known, select the next driver from the drop-down menu. Or, type in the next driver and click either Create "future driver" or Create and edit... to create a new future driver, and edit the driver details.
Kế hoạch đổi xe: nếu tài xế hiện tại của xe này có kế hoạch đổi xe - do đang chờ xe mới được đặt hàng hoặc đây là xe tạm thời và họ đã biết xe tiếp theo mình sẽ lái - hãy tích vào ô này. Không tích ô này nếu tài xế hiện tại không có kế hoạch đổi xe.
Ngày giao: sử dụng lịch thả xuống, chọn thời điểm tài xế khác có thể sử dụng xe. Chọn ngày bằng cách đi đến tháng và năm chính xác bằng cách sử dụng các biểu tượng ⬅️ (mũi tên trái) và ➡️ (mũi tên phải). Sau đó, nhấp vào ngày cụ thể. Nếu trường này được để trống, thì có nghĩa là xe hiện đang khả dụng và có thể được giao lại cho tài xế khác. Nếu trường này đã được điền, tài xế khác sẽ không thể sử dụng xe cho đến ngày đã chọn.
Company: select the company from the drop-down menu. This field only appears in a multi-company database.
Tạo tài xế mới
Nếu tài xế chưa có trong hệ thống, tài xế mới nên được cấu hình và thêm vào cơ sở dữ liệu trước. Tài xế mới có thể được thêm từ trường Tài xế hoặc Tài xế tương lai trên biểu mẫu xe.
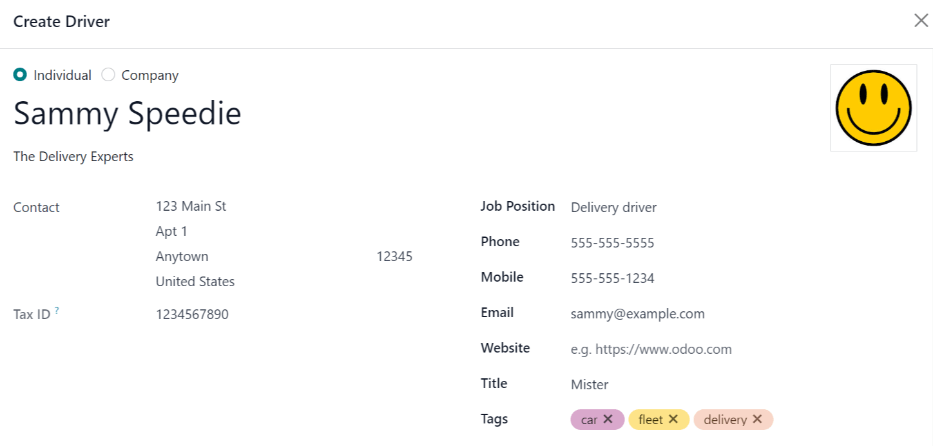
Đầu tiên, nhập tên của tài xế mới vào trường Tài xế hoặc Tài xế tương lai, sau đó nhấp Tạo và chỉnh sửa.... Biểu mẫu Tạo tài xế hoặc Tạo tài xế tương lai xuất hiện, tùy thuộc vào trường nào khởi tạo biểu mẫu.
Both the Create Driver and Create Future Driver forms are identical.
Ghi chú
Tùy thuộc vào các ứng dụng đã cài đặt, các tab hoặc trường khác nhau có thể hiển thị trên biểu mẫu Tạo tài xế và Tạo tài xế tương lai.
Thông tin chung
Điền các thông tin sau vào nửa trên của biểu mẫu:
Individual or Company: choose if the driver being added is an individual driver or a company. Click the radio button to make a selection.
When a selection is made, some fields may disappear from the form. If any of the fields below are not visible, that is because Company was selected instead of Individual.
Name: enter the name of the driver or company in this field.
Company Name...: using the drop-down menu, select the company the driver is associated with.
If the Company radio button is selected at the top of the form, this field does not appear.
Contact: enter the contact information in this section.
If desired, the Contact field can be changed to a different type of contact. Click on Contact to reveal a drop-down menu. The available options to select are Contact, Invoice Address, Delivery Address, Follow-up Address, or Other Address.
If desired, select one of these other options for the Contact field, and enter the corresponding information.
If the Company radio button is selected at the top of the form, this field is labeled Address and cannot be modified.
Tax ID: enter the driver or company's tax ID in this field.
Job Position: enter the driver's job position in this field. If the Company radio button is selected at the top of the form, this field does not appear.
Phone: enter the driver or company's phone number in this field.
Mobile: enter the driver or company's mobile number in this field.
Email: enter the driver or company's email address in this field.
Website: enter the driver or company's website address in this field.
Title: using the drop-down menu, select the driver's title in this field. The default options are Doctor, Madam, Miss, Mister, and Professor.
If the Company radio button is selected at the top of the form, this field does not appear.
Tags: using the drop-down menu, select any tags that apply to the driver or company.
To add a new tag, type in the tag, then click Create "tag".
There is no limit to the number of tags that can be selected.
Tab Liên hệ & Địa chỉ
After completing the top-half of the Create Driver or Create Future Driver form, add any other contacts and addresses associated with the driver or company in this tab.
To add a new contact, click the Add button, and a Create Contact pop-up window appears.
Before entering the necessary information on the form, select the type of contact being added from a series radio button options located at the top of the form. Those options are:
Contact: select this option to add general contact details for employees of the associated company.
Invoice Address: select this option to add a preferred address for all invoices. When added to the form, this address is selected by default when sending an invoice to the associated company.
Delivery Address: select this option to add a preferred address for all deliveries. When added to the form, this address is selected by default when delivering an order to the associated company.
Follow-up Address: select this option to add a preferred address for all follow-up correspondence. When added to the form, this address is selected by default when sending reminders about overdue invoices.
Other Address: select this option to add any other necessary addresses for the company or driver.
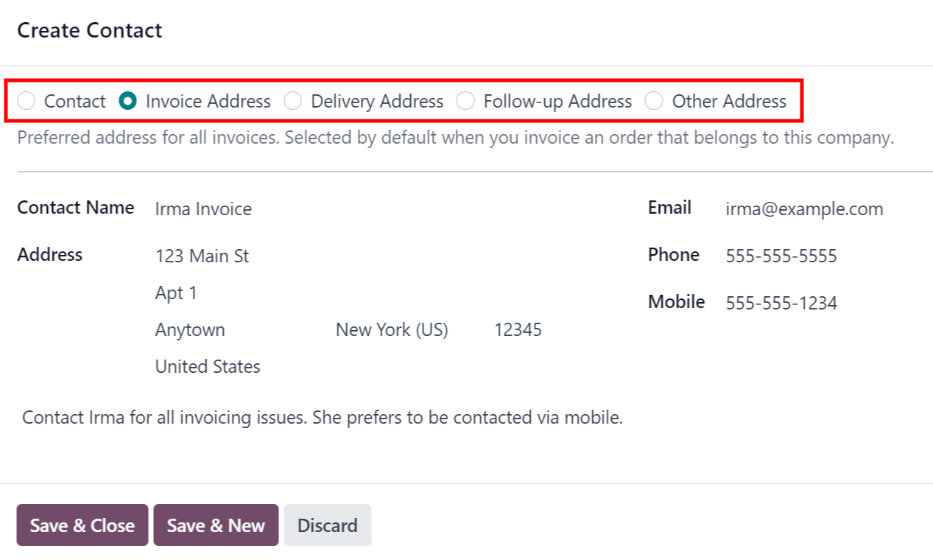
Depending on the Contact Type, some optional fields may not be visible. The available fields are identical to the fields in the general information section of the new driver form.
Add any notes to the Internal notes... section of the form.
After entering all of the information, click either Save & Close to add the one new contact, or Save & New to add the current address record and create another address record.
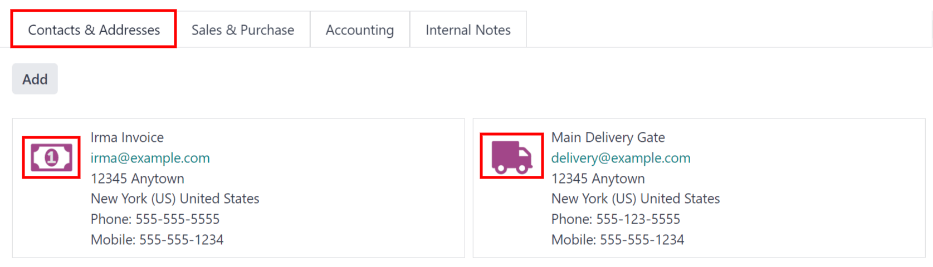
As contacts are added to this tab, each contact appears in a separate box, with an icon indicating what type of contact is listed.
Example
An Invoice Address displays a 💲 (dollar sign) icon inside that specific address box, whereas a Delivery Address displays a 🚚 (truck) icon inside.
Tab Bán hàng & Mua hàng
Enter the following sales and purchasing information, in the Sales & Purchase tab of the Create Driver or Create Future Driver pop-up form for the various sections below.
Depending on the other installed applications, additional fields and sections may appear. The following are all default fields for the Fleet application only.
Phần bán hàng
Salesperson: using the drop-down menu, select the user who is the main point of contact for sales with this driver's company.
This person must be an internal user of the company, meaning they can log into the database as a user.
Thông tin khác
Company ID: if the company has an ID number, other than its tax ID, enter it in this field.
Reference: enter any text to give more information regarding the contact person. This is an internal note to provide any additional information.
Example
A company has several people with the same name, John Smith. The Reference field could state
John Smith at X205 - purchaserto provide additional details.
Tab ghi chú nội bộ
Add any notes that pertain to the driver, or any other necessary information, in this tab.
Vehicle section
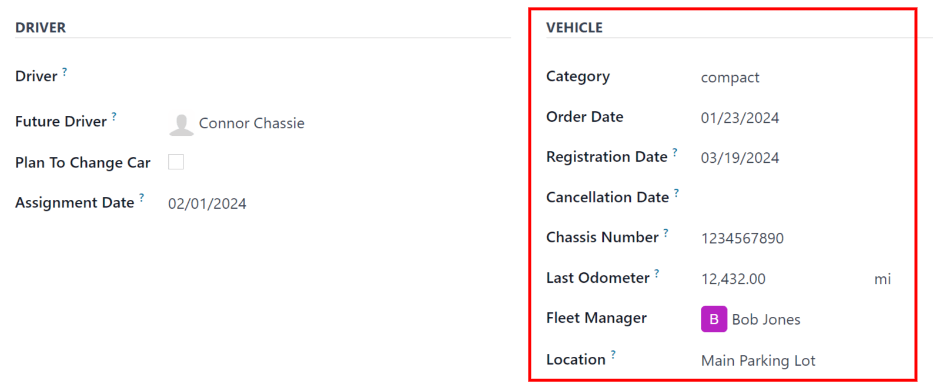
This section of the vehicle form relates to the physical details of the vehicle.
If a preexisting vehicle in the database was selected for the Model field in the top portion of the form, some fields may auto-populate, and additional fields may also appear.
Điền các trường sau vào biểu mẫu:
Category: using the drop-down menu, select the vehicle category from the available options. To create a new category, type in the new category name, then click Create "category".
Order Date: using the drop-down calendar, select the date the vehicle was ordered.
Registration Date: using the drop-down calendar, select the date the vehicle was registered.
Cancellation Date: using the drop-down calendar, select the date the vehicle lease expires, or when the vehicle is no longer available.
Chassis Number: enter the chassis number in the field. This is known in some countries as the VIN number.
Last Odometer: enter the last known odometer reading in the number field. Using the drop-down menu next to the number field, select whether the odometer reading is in kilometers (km) or miles (mi).
Fleet Manager: select the fleet manager from the drop-down menu, or type in a new fleet manager, and click either Create or Create and Edit.
Location: type in the specific location where the vehicle is typically located in this field. The entry should clearly explain where the vehicle can be found, such as
Main GarageorBuilding 2 Parking Lot.
Tab Thông tin thuế
Tùy thuộc vào cài đặt bản địa hóa cho cơ sở dữ liệu và các ứng dụng bổ sung nào được cài đặt, các trường khác có thể xuất hiện trên biểu mẫu.
Các phần bên dưới là mặc định và xuất hiện cho tất cả các xe, bất kể cài đặt bản địa hóa hoặc ứng dụng đã cài đặt khác.
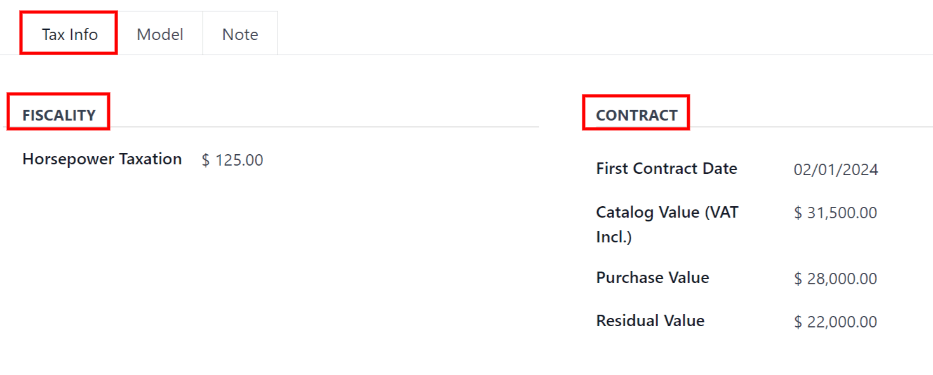
Tài chính
Horsepower Taxation: enter the amount that is taxed based on the size of the vehicle's engine. This is determined by local taxes and regulations, and varies depending on the location. It is recommended to check with the accounting department to ensure this value is correct.
Hợp đồng
First Contract Date: select the start date for the vehicle's first contract using the drop-down calendar. Typically this is the day the vehicle is purchased or leased.
Catalog Value (VAT Incl.): enter the MSRP (Manufacturer's Suggested Retail Price) for the vehicle at the time of purchase or lease.
Purchase Value: enter the purchase price or the value of the lease for the vehicle.
Residual Value: enter the current value of the vehicle.
Ghi chú
Các giá trị được liệt kê ở trên ảnh hưởng đến phòng ban kế toán. Nên kiểm tra với phòng ban kế toán để biết thêm thông tin và/hoặc được hỗ trợ với các giá trị này.
Tab Mẫu xe
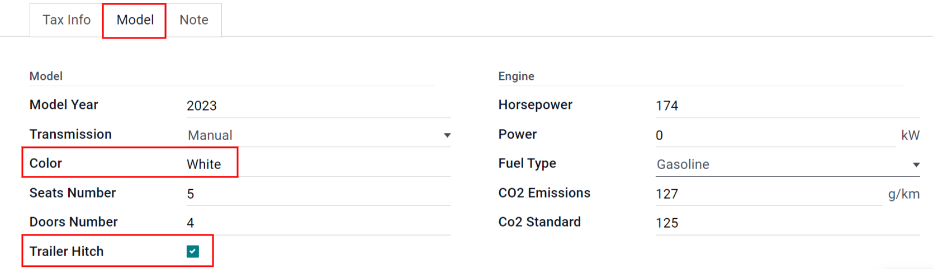
If the model for the new vehicle is already configured in the database, the Model tab will be populated with the corresponding information. If the model is not already in the database and the Model tab needs to be configured, configure the new vehicle model.
Kiểm tra thông tin trong tab Mẫu xe để đảm bảo chính xác. Ví dụ, màu sắc của phương tiện hoặc việc có lắp đặt móc kéo hay không là những thông tin phổ biến có thể cần cập nhật.
Tab Ghi chú
Nhập bất kỳ ghi chú nào cho xe trong phần này.