
Apply inventory adjustments with barcodes
Trong kho hàng, số lượng tồn kho được ghi nhận trong cơ sở dữ liệu có thể không phải lúc nào cũng khớp với số lượng thực tế. Trong trường hợp đó, có thể thực hiện điều chỉnh tồn kho để đối chiếu sự chênh lệch và đảm bảo rằng số liệu ghi nhận trong cơ sở dữ liệu khớp với số lượng thực tế trong kho. Trong Odoo, ứng dụng Mã vạch có thể được sử dụng để thực hiện các điều chỉnh này.
These adjustments can be done in real time using an Odoo-compatible barcode scanner or the Odoo mobile app.
Ghi chú
For a list of Odoo-compatible barcode mobile scanners, and other hardware for the Inventory and Barcode apps, refer to the Odoo Inventory • Hardware page.
Xem thêm
Kích hoạt ứng dụng Mã vạch
To use the Barcode app to create and apply inventory adjustments, it must be installed by enabling the feature from the settings of the Inventory app.
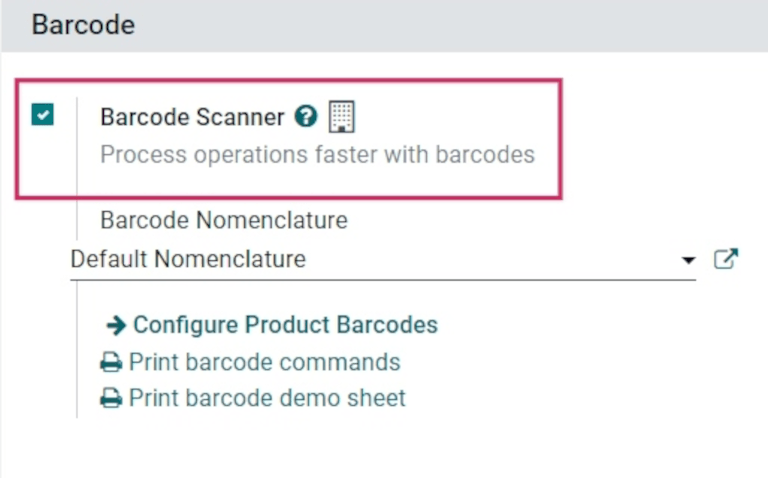
To do so, go to the . Then, scroll down to the Barcode section, and click the checkbox next to the Barcode Scanner option.
Sau khi đánh dấu vào ô, nhấp Lưu ở đầu trang để lưu thay đổi.
Sau khi lưu, một menu thả xuống mới xuất hiện dưới tùy chọn Máy quét mã vạch, có nhãn Danh pháp mã vạch, trong đó có thể chọn Danh pháp mặc định hoặc Danh pháp GS1 mặc định. Mỗi tùy chọn danh pháp xác định cách máy quét diễn giải mã vạch trong Odoo.
There is also a Configure Product Barcodes internal link arrow, along with a set of Print buttons for printing barcode commands and a barcode demo sheet.
Xem thêm
For more information on setting up and configuring the Barcode app, refer to the Set up your barcode scanner and Activate the Barcodes in Odoo docs.
Perform an inventory adjustment
Begin by navigating to the dashboard, where different options will be displayed, including Operations, Inventory Adjustments, and Batch Transfers.
To create and apply inventory adjustments, click on the Inventory Adjustments button at the bottom of the screen.
Doing so navigates to the Barcode Inventory Client Action page, labeled as Inventory Adjustment in the top header section.
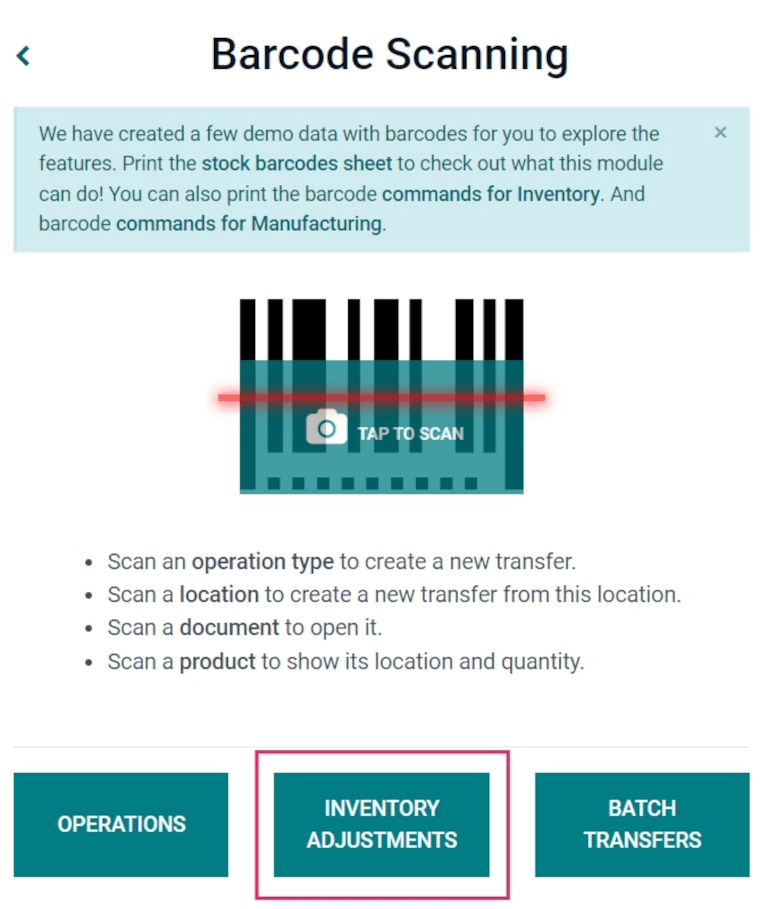
To begin the adjustment, first scan the source location, which is the current location in the warehouse of the product whose count should be adjusted. Then, scan the product barcode(s).
The barcode of a specific product can be scanned multiple times to increase the quantity of that product in the adjustment.
Mẹo
If the warehouse multi-location feature is not enabled in the database, a source location does not need to be scanned. Instead, simply scan the product barcode to start the inventory adjustment.
Alternatively, the quantity can be changed by clicking the ✏️ (pencil) icon on the far right of the product line.
Doing so opens a separate window with a keypad. Edit the number in the Quantity line to change the quantity. Additionally, the +1 and -1 buttons can be clicked to add or subtract quantity of the product, and the number keys can be used to add quantity, as well.
Example
In the below inventory adjustment, the source location WH/Stock/Shelf/2 was scanned, assigning
the location. Then, the barcode for the product [FURN_7888] Desk Stand with Screen was scanned
3 times, increasing the units in the adjustment. Additional products can be added to this
adjustment by scanning the barcodes for those specific products.
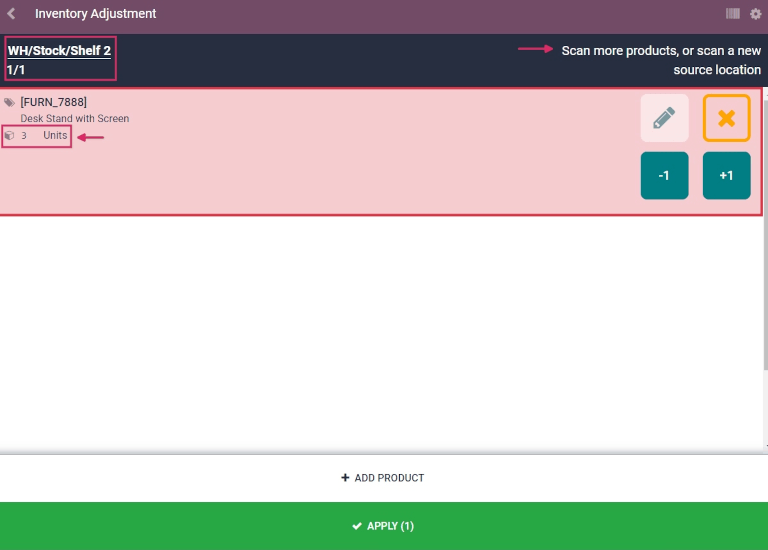
To complete the inventory adjustment, click the green ✅ Apply button with the check mark at the bottom of the page.
Once applied, Odoo navigates back to the Barcode Scanning screen. A small green banner appears in the top right corner, confirming validation of the adjustment.
Did you know?
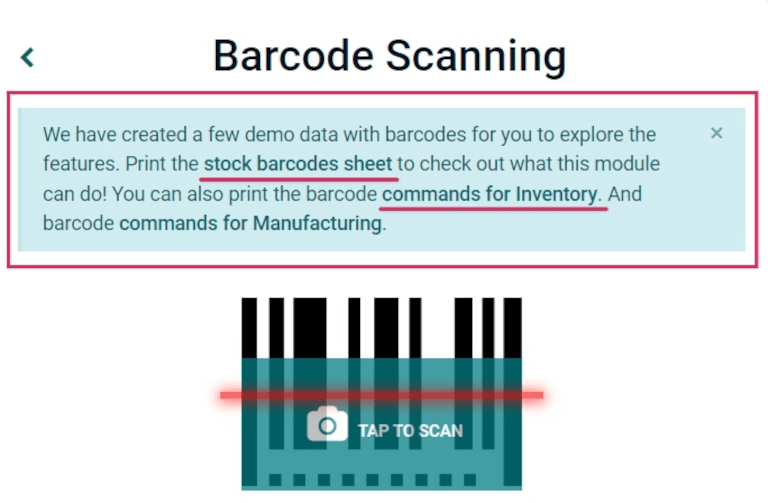
Odoo's Barcode application provides demo data with barcodes to explore the features of the app. These can be used for testing purposes, and can be printed from the home screen of the app.
To access this demo data, navigate to the and click stock barcodes sheet and commands for Inventory (bolded and highlighted in blue) in the information pop-up window above the scanner.
Manually add products to inventory adjustment
When the barcodes for the location or product are not available, Odoo Barcode can still be used to perform inventory adjustments.
To do this, navigate to the .
Doing so navigates to the Barcode Inventory Client Action page, labeled as Inventory Adjustment in the top header section.
To manually add products to this adjustment, click the white ➕ Add Product button at the bottom of the screen.
Điều này chuyển đến trang mới trống, nơi phải chọn sản phẩm, số lượng và vị trí nguồn mong muốn.
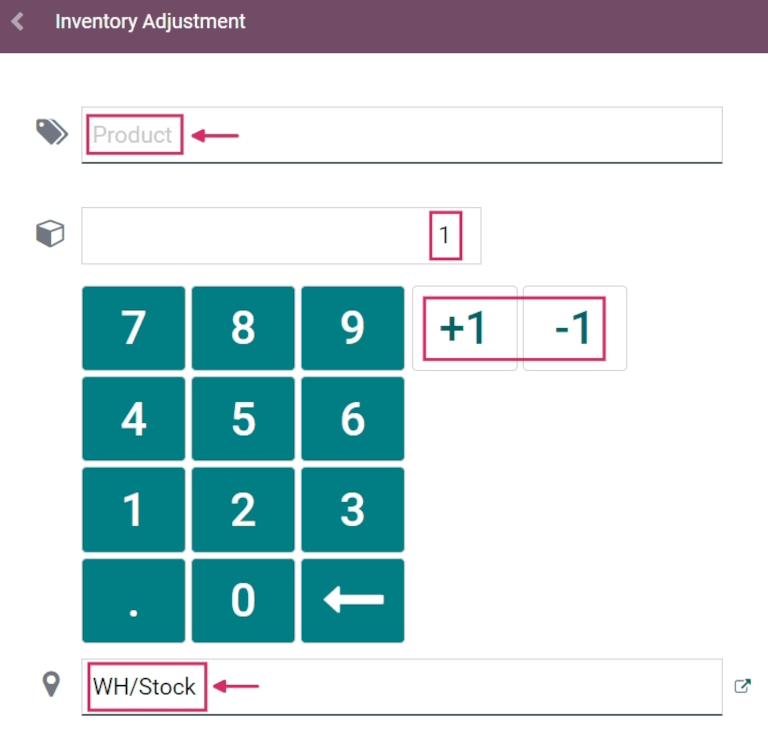
Đầu tiên, nhấp vào dòng Sản phẩm và chọn sản phẩm cần điều chỉnh tồn kho. Sau đó, nhập thủ công số lượng của sản phẩm đó bằng cách thay đổi số 1 trong dòng Số lượng, hoặc nhấp vào các nút +1 và -1 để tăng/giảm số lượng sản phẩm. Bạn cũng có thể sử dụng bàn phím số để nhập số lượng.
Bên dưới bàn phím số là dòng vị trí, mặc định sẽ hiển thị WH/Stock. Nhấp vào dòng này để hiển thị menu thả xuống các vị trí có thể chọn, và chọn vị trí nguồn cho điều chỉnh tồn kho này.
Once ready, click Confirm to confirm the changes.
To apply the inventory adjustment, click the green ✅ Apply button with the check mark, at the bottom of the page.
Once applied, Odoo navigates back to the Barcode Scanning screen. A small green banner appears in the top right corner, confirming validation of the adjustment.