
Hóa đơn điện tử (EDI)
EDI, hay trao đổi dữ liệu điện tử, là việc trao đổi các tài liệu kinh doanh giữa các công ty, chẳng hạn như đơn đặt hàng và hóa đơn, ở định dạng chuẩn. Gửi tài liệu theo tiêu chuẩn EDI đảm bảo rằng hệ thống nhận được thông điệp có thể diễn giải thông tin một cách chính xác. Nhiều định dạng tệp EDI khác nhau có sẵn tùy thuộc vào quốc gia của công ty bạn.
The EDI feature allows companies to automate administrative processes. It may also be required by some governments for fiscal control or to support administrative procedures.
Electronic sending of documents such as customer invoices, credit notes, or vendor bills is one application of EDI.
Odoo supports, among others, the following formats.
Định dạng tên |
Khả năng áp dụng |
|---|---|
Factur-X (CII) |
Tất cả khách hàng |
Peppol BIS Billing 3.0 |
Tất cả khách hàng |
XRechnung (UBL) |
Tất cả khách hàng |
Fattura PA (IT) |
Công ty Ý |
CFDI (4.0) |
Công ty Mexico |
Peru UBL 2.1 |
Công ty Peru |
SII IVA Llevanza de libros registro (ES) |
Công ty Tây Ban Nha |
UBL 2.1 (Columbia) |
Công ty Colombia |
Egyptian Tax Authority |
Công ty Ai Cập |
Hóa đơn điện tử (IN) |
Công ty Ấn Độ |
NLCIUS (Hà Lan) |
Công ty Hà Lan |
EHF 3.0 |
Công ty Na Uy |
SG BIS Billing 3.0 |
Công ty Singapore |
A-NZ BIS Billing 3.0 |
Tất cả khách hàng |
Ghi chú
The Factur-X (CII) format enables validation checks on the invoice and generates PDF/A-3 compliant files.
Every PDF generated by Odoo includes an integrated Factur-X XML file.
Xem thêm
Cấu hình
Theo mặc định, định dạng có sẵn trong cửa sổ gửi phụ thuộc vào quốc gia của khách hàng.
Để xác định định dạng hóa đơn điện tử cụ thể cho khách hàng, truy cập , mở biểu mẫu khách hàng, chuyển đến thẻ Kế toán và chọn Định dạng phù hợp trong phần Hóa đơn khách hàng.
Tạo hóa đơn điện tử
From a confirmed invoice, click Send & Print. In the Send window, enable the relevant e-invoicing format option (e.g., BIS Billing 3.0), then click Send & Print to generate and attach the corresponding e-invoicing XML file.
Peppol
Mạng lưới Peppol đảm bảo trao đổi tài liệu và thông tin giữa các công ty và cơ quan chính phủ. Nó chủ yếu được sử dụng cho hóa đơn điện tử và các điểm truy cập của nó (kết nối với mạng Peppol) cho phép các công ty gửi tài liệu điện tử như hóa đơn khách hàng và thẻ tín dụng cũng như nhận tài liệu như hóa đơn nhà cung cấp và hoàn tiền.
Trong trường hợp này, Odoo đóng vai trò vừa là điểm truy cập vừa là SMP và cho phép giao dịch hóa đơn điện tử mà không cần gửi hóa đơn qua email hoặc bưu điện.
Ghi chú
Make sure to install the Peppol module (
account_peppol).Đăng ký Peppol miễn phí và có sẵn trong Odoo Community.
Các định dạng được hỗ trợ để gửi tài liệu bao gồm BIS Billing 3.0, XRechnung CIUS và NLCIUS.
- Các quốc gia sau đây đủ điều kiện đăng ký Peppol trong Odoo:Andorra, Albania, Austria, Bosnia and Herzegovina, Belgium, Bulgaria, Switzerland, Cyprus, Czech Republic, Germany, Denmark, Estonia, Spain, Finland, France, United Kingdom, Greece, Croatia, Hungary, Ireland, Iceland, Italy, Liechtenstein, Lithuania, Luxembourg, Latvia, Monaco, Montenegro, North Macedonia, Malta, Netherlands, Norway, Poland, Portugal, Romania, Serbia, Sweden, Slovenia, Slovakia, San Marino, Turkey, Holy See (Vatican City State)
Đăng ký
To register on Peppol, go to , scroll to the PEPPOL Electronic Document Invoicing section, and fill in the following information:
Peppol EAS: Peppol Electronic Address Scheme, which usually depends on the company's country. This field is often prefilled with your country's most commonly used EAS code. For example, the preferred EAS code for most companies in Belgium is
0208.Peppol Endpoint: usually a Company Registry number or a VAT number
Mobile Number, including the country code (e.g.,
+32in Belgium)Primary contact email
Migration key: If you are migrating from another access point, copy the key from the previous provider.
Click Validate registration.
Xem thêm
Điểm cuối Peppol - OpenPeppol eDEC Code Lists (mở "Participant Identifier Schemes" dưới dạng trang HTML)
To request and receive a verification code, follow these steps:
Click Verify phone number in the PEPPOL Electronic Document Invoicing section.
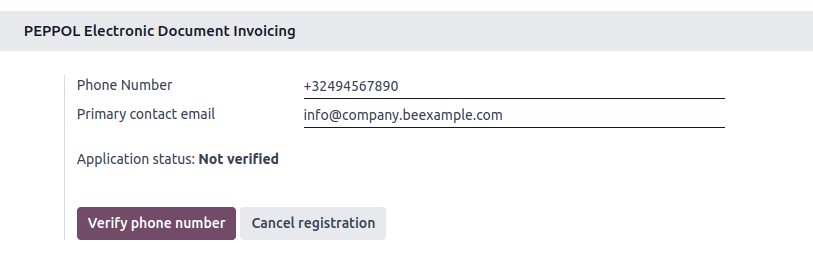
A text message containing a code is sent to the mobile number provided to finalize the verification process.
Enter the code and click Confirm. The registration is then pending activation.
Select another purchase journal in the Incoming Invoices Journal field if necessary.
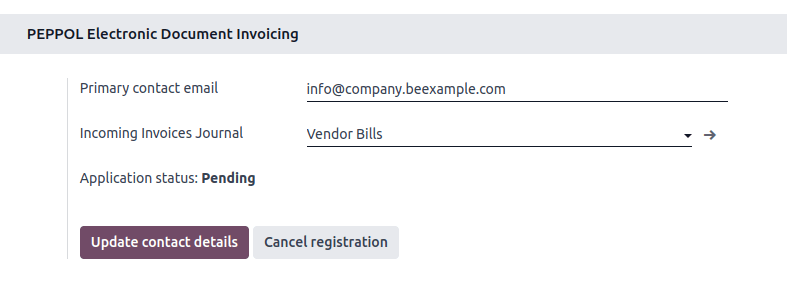
The registration should be automatically activated, and the Application status should be updated within a day.
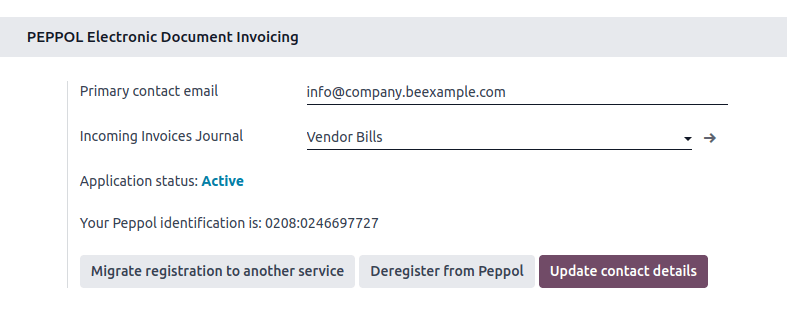
All invoices and vendor bills can then be sent directly using Peppol.
Ghi chú
To update the Primary contact email, modify it and click Update contact details.
Nếu bạn đang sử dụng điểm truy cập từ nhà cung cấp trước đó, hãy đảm bảo hủy đăng ký khỏi điểm truy cập đó trước, sau đó đăng ký với điểm truy cập mới, trừ khi đó là Hermes (BOSA). Nếu sử dụng Hermes (BOSA), không cần thao tác gì; việc chuyển đổi được xử lý tự động.
Mẹo
Để kích hoạt thủ công hành động theo lịch dùng để kiểm tra trạng thái đăng ký Peppol, bật chế độ nhà phát triển, mở ứng dụng Cài đặt, chuyển đến , và tìm kiếm Peppol: cập nhật trạng thái người tham gia. Mở hành động theo lịch, sau đó nhấp Chạy thủ công.
To try Peppol without sending real data, use the demo mode by setting the account_peppol.edi.mode system parameter to
demo.For advanced testing on Peppol's dedicated test network, use the test mode by setting the account_peppol.edi.mode system parameter to
test. This option is intended for experienced users only.
Xác minh liên hệ
Trước khi gửi hóa đơn cho liên hệ bằng Peppol, hãy đảm bảo liên hệ đã được đăng ký làm người tham gia Peppol. Để thực hiện, làm theo các bước sau:
Chuyển đến và truy cập biểu mẫu khách hàng.
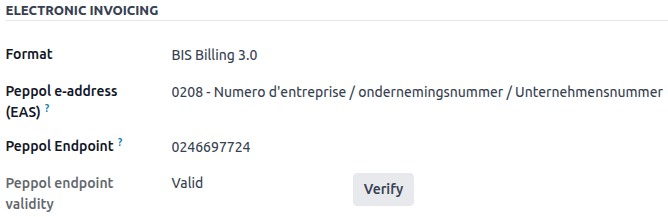
In the Accounting tab, check the following information in the Electronic Invoicing section:
Format: BIS Billing 3.0, XRechnung CIUS, or NLCIUS.
Peppol e-address (EAS): Select the relevant EAS code in the dropdown list.
Peppol Endpoint: Enter the customer's endpoint identifier.
Click Verify. Its Peppol endpoint validity is marked as Valid if the contact is found on the Peppol network.
Quan trọng
While Odoo prefills both the EAS code and the endpoint number based on the information available for a contact, verifying these details with the contact is recommended.
Gửi hoá đơn
To set Peppol as a default format for sending invoices, go to . In the Customer Invoices section, enable the Peppol format option and Save.
Posted invoices to be sent via Peppol are marked as Ready to send in the invoice's Peppol status field.
Ghi chú
All invoices that are ready to be sent via Peppol can be viewed in the following ways:
In the Invoices list view, use the (adjust settings) button to add the Peppol status column or apply the Peppol Ready filter in the search bar.
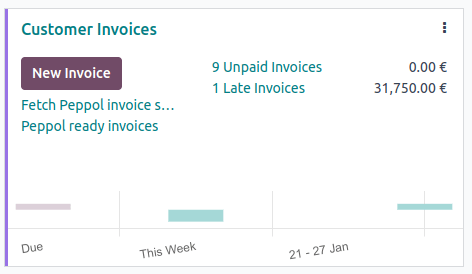
In the Accounting dashboard, click Peppol ready invoices on the relevant sales journal.
To send the invoice to the customer via Peppol, click Send & Print on the confirmed invoice form. In the Send window, enable both the country-specific format (e.g., BIS Billing 3.0) and Send via PEPPOL options, then click Send & Print.
Mẹo
Multiple invoices can also be sent in batches via Peppol.
Once the invoices are sent via Peppol, their Peppol status is changed to Processing.
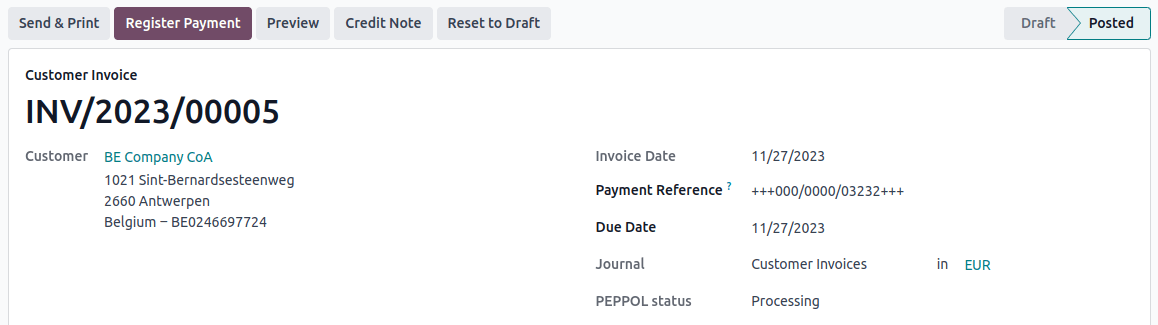
Trạng thái được cập nhật thành Hoàn thành khi hóa đơn đã được gửi thành công đến điểm truy cập của liên hệ.
Mẹo
To manually trigger the scheduled action used to check the invoices' status, go to the Accounting dashboard and click Fetch Peppol invoice status on the corresponding sales journal.
Nhận hóa đơn nhà cung cấp
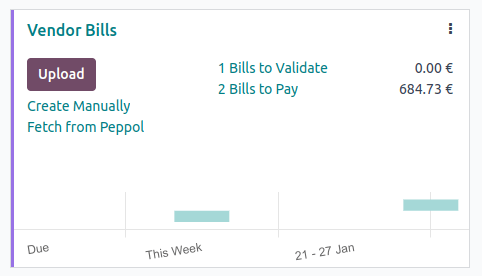
New documents received via Peppol are checked multiple times a day. Received documents are automatically imported into the purchase journal set in the PEPPOL Electronic Document Invoicing section, and corresponding vendor bills are created as drafts and appear in the vendor bills list view.
Mẹo
To manually trigger the scheduled action to retrieve incoming Peppol documents, go to the Accounting dashboard and click Fetch from Peppol on the main Peppol purchase journal.
Ghi chú
Cũng có thể gửi hóa đơn tự xuất qua Peppol.
Thêm trường bổ sung
Quan trọng
Việc thêm trường yêu cầu ứng dụng Studio.
Odoo hỗ trợ các trường Peppol phổ biến nhất theo mặc định, nhưng dữ liệu Peppol bổ sung có thể được bao gồm khi gửi hóa đơn điện tử qua Peppol bằng cách thêm trường bổ sung vào hóa đơn bằng Studio.
Bảng dưới đây cho thấy:
các trường Peppol bổ sung có thể được thêm. Các trường trong:
Phần Hóa đơn chính được thêm vào chế độ xem biểu mẫu của hóa đơn
Phần Dòng hóa đơn được thêm vào chế độ xem danh sách của dòng hóa đơn
kiểu dữ liệu phải khớp với loại trường khi thêm trường bằng Studio
nhãn trường chính xác phải được nhập khi thêm trường bằng Studio
Quan trọng
Odoo sử dụng nhãn của trường mới để tự động tạo tên kỹ thuật của trường. Để đảm bảo tên kỹ thuật của trường được định dạng chính xác, điều quan trọng là phải sử dụng văn bản chính xác từ cột Nhãn trường Studio bên dưới.
Tên kỹ thuật Peppol (XML) |
Kiểu dữ liệu |
Nhãn trường Studio |
|
|---|---|---|---|
Hóa đơn chính |
TaxPointDate |
Ngày |
|
ContractDocumentReference.ID |
Văn bản |
|
|
DespatchDocumentReference.ID |
Văn bản |
|
|
AccountingCost |
Văn bản |
|
|
ProjectReference.ID |
Văn bản |
|
|
InvoicePeriodStartDate |
Ngày |
|
|
InvoicePeriodEndDate |
Ngày |
|
|
OrderReference.ID |
Văn bản |
|
|
Chi tiết hóa đơn |
OrderLineReference/LineID |
Văn bản |
|
item.buyersItemIdentification |
Văn bản |
|
Để thêm trường mới vào dạng xem biểu mẫu hóa đơn hoặc dạng xem danh sách dòng hóa đơn, tùy theo trường hợp, hãy làm theo các bước sau:
Kích hoạt chế độ nhà phát triển.
Điều hướng đến (hoặc đối với người dùng Lập hóa đơn).
Mở hóa đơn hiện có hoặc nhấp vào Mới.
Mở Studio bằng cách nhấp vào biểu tượng (Bật/Tắt Studio).
Nếu thêm trường vào dạng xem danh sách dòng hóa đơn, hãy nhấp vào tab Dòng hóa đơn và nhấp vào Chỉnh sửa dạng xem danh sách.
Nhấp và kéo trường Văn bản hoặc Ngày từ bảng điều khiển bên trái đến vị trí mong muốn trong dạng xem bên phải.
Nhập Nhãn chính xác như nó xuất hiện trong cột Nhãn trường Studio trong bảng trên, sau đó nhấp bên ngoài nhãn trường để thấy Tên kỹ thuật tự động cập nhật.
Nhấp vào Đóng để lưu tất cả các thay đổi.
Ghi chú
Tên kỹ thuật trong Odoo phải khớp với định dạng x_studio_peppol_tax_point_date. Nếu có nhầm lẫn và tên kỹ thuật không chính xác, hãy chỉnh sửa tên kỹ thuật.
Mẹo
Sau khi trường mới được tạo như đã giải thích ở trên, nó có thể được thêm vào các dạng xem khác chẳng hạn như dạng xem danh sách hóa đơn.
Hủy đăng ký Peppol khỏi Odoo
Only one Peppol receiver registration can be active for each Peppol endpoint identifier at a time. To stop using Odoo as the Peppol access point, e.g., to switch to another provider or reconfigure the registration for a new database, you must first deregister from Peppol. To do so, go to , scroll down to the PEPPOL Electronic Invoicing section, click Remove from Peppol, and confirm.
Sau khi xóa, đăng ký Peppol sẽ bị xóa khỏi cơ sở dữ liệu và tài liệu không thể gửi hoặc nhận qua Peppol trong Odoo nữa.